A Complete Technical Guide for Safe Disconnection, Damage Prevention, and Professional-Level Fuel System Service
Fuel lines are not simple hoses anymore. Modern vehicles use high-pressure fuel systems, quick-connect fittings, push-lock connectors, spring-lock retainers, plastic composite lines, and integrated safety seals. Removing them incorrectly doesn’t just cause leaks, it causes connector failure, broken fittings, fuel spray injuries, vapor ignition risks, and expensive system damage.
This is why fuel line removal is not about force. It is about correct tools, correct technique, and correct procedure.
This guide explains:
- Why fuel line tools are necessary
- Types of fuel line connections
- The exact tools required
- How each tool works
- What not to use
- Safety protocols
- Professional-level techniques
- DIY vs shop procedures
- Common mistakes
- Damage prevention
- A full FAQ section
Why Fuel Line Removal Requires Special Tools
Modern fuel systems operate under high pressure:
- Port injection: 40 to 60 psi
- Direct injection: 500 to 3,000+ psi
- Diesel common rail: up to 30,000 psi
Fuel lines use locking mechanisms designed to seal under pressure, not slide off easily. These include:
- Internal retaining springs
- Locking tabs
- O-ring compression seals
- Push-connect retainers
- Plastic collar locks
- Dual-stage locking clips
Trying to remove these without the correct tool usually results in:
- Broken connectors
- Cracked fuel rails
- Deformed lines
- Leaking seals
- Damaged retaining clips
- Unsafe fuel leaks
- Fire hazards
Correct tools prevent damage and keep the system reusable.
Types of Fuel Line Connections
Before choosing tools, you must identify the connection type.
1. Quick-Connect Fittings
Most common on modern vehicles. They use internal locking clips that grip a ridge on the fuel line.
2. Spring-Lock Connectors
Use internal circular springs to hold the line in place.
3. Push-Lock Connectors
Line pushes in and locks automatically.
4. Plastic Retainer Clips
Visible external clips that lock the fitting.
5. Threaded Fittings
Less common in modern vehicles but still present in some fuel rails and pumps.
6. Barbed Hose Connections
Used on low-pressure return lines and older vehicles.
Each type requires a different tool or method.
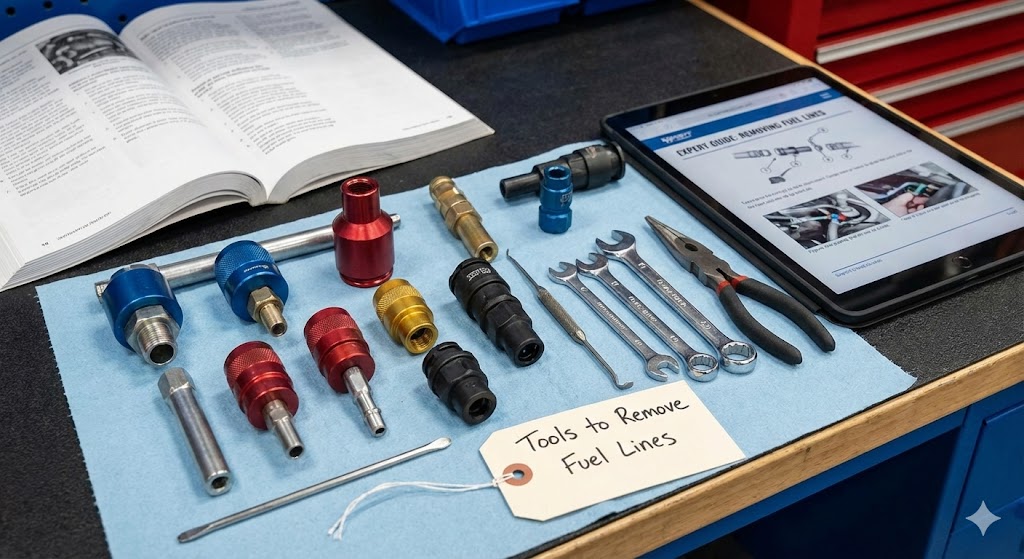
Essential Tools to Remove Fuel Lines
1. Fuel Line Disconnect Tool Set
This is the primary tool for most modern vehicles.
Description
Plastic or metal circular tools that slide into the connector to release internal locking springs.
Common sizes:
- 1/4 inch
- 5/16 inch
- 3/8 inch
- 1/2 inch
- 5/8 inch
How it works:
The tool slides between the connector and the fuel line, compressing the internal retaining spring so the line can slide out smoothly.
Use cases:
- Fuel filters
- Fuel rails
- Fuel pumps
- Fuel injectors
- EVAP lines
- Return lines
This is the most important fuel line tool.
2. Scissor-Style Fuel Line Disconnect Tool
Description
Scissor-style pliers with interchangeable inserts for different line sizes.
Advantages:
- Better leverage
- One-hand operation
- More control in tight spaces
- Less connector damage
Best for:
- Tight engine bays
- Hard-to-reach fuel rails
- High-pressure lines
- Professional use
3. Spring-Lock Disconnect Tool
Description
Split-ring metal tools designed to compress circular retaining springs.
Used on:
- Older Ford systems
- Some GM systems
- Transmission lines
- Fuel return lines
How it works:
The tool expands inside the fitting and compresses the internal spring so the line can release.
4. Fuel Line Clip Removal Tool
Description
Small plastic or metal pry tools designed to remove external retaining clips.
Use cases:
- Plastic clip connectors
- Locking tab fittings
- Secondary safety locks
Prevents breaking fragile plastic retainers.
5. Hose Clamp Pliers
Description
Special pliers designed to compress spring hose clamps.
Used on:
- Low-pressure fuel lines
- Return hoses
- Vent lines
- Vapor lines
Prevents tearing hoses and breaking fittings.
6. Line Release Picks and Hooks
Description
Precision hook tools for releasing locking tabs and safety clips.
Use cases:
- Electrical/fuel hybrid connectors
- Hidden locking tabs
- Dual-stage locks
7. Fuel Pressure Relief Tool
Not a removal tool, but critical.
Purpose:
Relieves system pressure before disconnecting lines.
Methods:
- Schrader valve depressor
- Scan tool pressure relief
- Fuel pump relay removal method
Prevents fuel spray injuries and fire risk.
8. Fuel Line Cap Kit
Description
Rubber and plastic caps used to seal open lines after removal.
Purpose:
- Prevent fuel leaks
- Prevent contamination
- Reduce vapor exposure
- Improve safety
Professional shops always use caps.
What NOT to Use
These cause damage:
- Screwdrivers
- Pliers
- Channel locks
- Vice grips
- Utility knives
- Picks without protection
- Forcing by pulling
- Twisting aggressively
These break connectors and deform fittings.
Proper Fuel Line Removal Procedure
Step 1: Relieve fuel pressure
This is mandatory.
Methods:
- Remove fuel pump relay and crank engine
- Use Schrader valve
- Use scan tool
- Manufacturer procedure
Step 2: Disconnect battery
Prevents accidental sparks.
Step 3: Identify connector type
Step 4: Select correct tool size
Step 5: Clean area
Prevents contamination entering fuel system.
Step 6: Insert disconnect tool properly
Never force.
Step 7: Compress locking mechanism
Step 8: Gently pull line straight out
Step 9: Cap open lines
Step 10: Inspect seals and connectors
Professional Technique Tips
- Push the line inward first before releasing
- Never pry against plastic connectors
- Always support both sides of the fitting
- Use silicone spray for stubborn connectors
- Keep connectors aligned
- Never twist quick-connect fittings
- Always replace damaged O-rings
Safety Protocols
Fuel is not just liquid. It is vapor.
- Work in ventilated area
- No open flames
- No sparks
- No smoking
- Use gloves
- Eye protection
- Fire extinguisher nearby
- No power tools near open fuel lines
Common Mistakes
- Not relieving pressure
- Using wrong tool size
- Forcing connectors
- Breaking locking tabs
- Ignoring damaged O-rings
- Not capping lines
- Contaminating fuel system
- Over-tightening reassembly
DIY vs Professional Tools
DIY kits:
Plastic disconnect sets are sufficient for most home jobs.
Professional tools:
Metal tools, scissor disconnect tools, pressure-rated disconnect kits, and cap systems.
Why Correct Tools Matter Economically
Fuel line repair costs:
- Connector replacement: $80 to $300
- Fuel rail replacement: $400 to $1,200
- Fuel line replacement: $300 to $900
- Fire damage: catastrophic
Correct tools cost:
- $10 to $50
Tool cost is trivial compared to repair cost.
FAQ
What is the main tool needed to remove fuel lines?
A fuel line disconnect tool set is the primary tool required.
Can I remove fuel lines without special tools?
You can, but you will likely damage connectors and cause leaks.
Are all fuel line tools universal?
No. Different vehicles use different connector styles and sizes.
Do I need to relieve pressure before removal?
Yes. Always. Fuel spray injuries are dangerous and flammable.
Why won’t my fuel line disconnect even with the tool?
Often the line needs to be pushed inward first to release tension.
Can I reuse fuel line connectors?
Yes, if they are not damaged and seals are intact.
Should O-rings be replaced?
If damaged or flattened, yes. Always use fuel-rated O-rings.
Can fuel line clips break easily?
Yes. Plastic clips become brittle with heat and age.
Is twisting fuel lines safe?
No. It damages internal seals and connectors.
Are diesel fuel lines different?
Yes. Higher pressure systems require reinforced tools and stricter safety.
Final Technical Conclusion
Fuel line removal is not about strength. It is about precision. Modern fuel systems are engineered to seal under pressure and resist vibration, not to be removed easily. Using the correct tools protects the system, prevents leaks, avoids fire hazards, and ensures the system remains reusable.
The correct tool kit transforms fuel line service from a risky job into a controlled procedure.
If you touch fuel lines, proper tools are not optional. They are required.
.
Connect with us


