Are Mazda SUVs Reliable – Expert Advice

A Deep Ownership Guide Based on Engineering, Real-World Use, and Long-Term Reality
Mazda SUVs occupy a unique space in the market. They are not positioned as budget vehicles, but they are not luxury-priced either. They compete on design, driving feel, and engineering discipline rather than flashy tech or gimmicks. But for most buyers, one question matters more than styling or driving dynamics:
Are Mazda SUVs actually reliable long-term vehicles, or do they just feel good when new?
The short answer is yes, Mazda SUVs are generally reliable.
The long answer is more nuanced, and far more useful for buyers who plan to keep their vehicle long-term.
Reliability is not a single trait. It is a combination of mechanical durability, system simplicity, repair predictability, and long-term ownership stability. Some brands build reliable engines but unreliable electronics. Others build strong drivetrains but weak transmissions. Some brands look reliable early but become expensive after 100,000 miles.
Mazda’s reliability profile is different. It is built on conservative mechanical design, mature engineering platforms, and incremental technology adoption rather than radical experimentation. That approach tends to produce vehicles that age well.
What “Reliable” Actually Means in Real Ownership
Most people think reliability means “it doesn’t break.”
In reality, reliability has layers:
- Mechanical longevity
Engines, transmissions, drivetrains, and cooling systems surviving high mileage without major failure. - Operational stability
Fewer warning lights, sensor failures, electronic glitches, and software issues. - Maintenance predictability
Routine service remains routine instead of becoming repair-heavy. - Cost stability
Repairs remain affordable and predictable, not sudden catastrophic expenses.
Mazda SUVs generally perform well in all four categories, especially when compared to brands that use more complex powertrains or experimental systems.
Mazda’s Engineering Philosophy and Why It Matters
Mazda does not engineer vehicles like most mainstream brands.
Instead of chasing extreme fuel economy through complex turbo-hybrid systems or heavy electrification early, Mazda focused on:
- High-compression naturally aspirated engines
- Efficient combustion design
- Lightweight vehicle architecture
- Balanced power-to-weight ratios
- Conservative transmission tuning
- Mechanical simplicity
This philosophy matters for reliability because complexity is the enemy of longevity.
Fewer moving parts means fewer failure points.
Fewer electronic dependencies mean fewer system-level faults.
Simpler drivetrains mean fewer cascading failures.
Mazda has historically avoided:
- Dual-clutch transmissions in mass models
- Early hybrid complexity
- Experimental CVT systems
- Over-electrification of basic systems
That conservative design strategy pays dividends long-term.
Powertrain Reliability
Engines
Mazda’s Skyactiv-G gasoline engines are widely considered some of the most durable mass-market engines in modern vehicles. They use:
- High compression ratios
- Direct injection
- Optimized combustion chambers
- Efficient thermal management
- Strong internal component tolerances
These engines are not built for extreme output. They are built for longevity and consistency.
They are not highly stressed engines, which is one of the biggest predictors of long-term reliability.
Turbocharged Mazda engines are also generally reliable, but like all turbo engines, they require:
- More frequent oil changes
- Higher-quality oil
- Better cooling maintenance
- Proper warm-up and cool-down habits
Turbo reliability is more owner-behavior dependent.
Transmissions
Mazda primarily uses traditional automatic transmissions, not CVTs and not dual-clutch systems in most of its SUVs.
This matters.
Traditional automatics:
- Handle torque better
- Age more predictably
- Are easier to service
- Are more tolerant of heat
- Have better long-term durability
This is a major reliability advantage compared to brands that rely heavily on CVTs.
Electrical and Software Reliability
This is where modern vehicles struggle across the industry.
Mazda SUVs are not immune to:
- Infotainment glitches
- Sensor errors
- Software updates
- Camera system faults
- Driver-assist calibration issues
However, these are typically non-drivetrain issues. They do not affect the ability of the vehicle to move, operate safely, or function mechanically.
In other words:
Mazda SUVs may occasionally have software annoyances, but they rarely have systemic mechanical failures.
That distinction matters for long-term ownership.
Suspension, Steering, and Chassis Reliability
Mazda builds vehicles with a strong emphasis on driving dynamics, which means:
- Rigid chassis design
- Proper suspension geometry
- Balanced weight distribution
- Controlled body movement
- Strong steering components
This reduces uneven wear, improves component life, and minimizes stress on joints and bushings.
Suspension wear is normal in all vehicles, but Mazda components tend to wear predictably, not prematurely.
Reliability by Mazda SUV Model
Mazda CX-5
One of the most reliable compact SUVs in its segment.
Long production history, mature platform, proven engines and transmissions.
Excellent long-term ownership reputation.
Mazda CX-30
Mechanically solid, newer platform.
Reliability is good, but newer models naturally carry more software complexity.
Mazda CX-50
Strong structural platform.
Good mechanical reliability, but newer platform means less long-term data.
Mazda CX-9 (previous generation)
Strong V6 reliability record.
Good long-term durability when properly maintained.
Mazda CX-90 (new generation large SUV)
Advanced platform with more complexity.
Too new for full long-term reliability assessment.
Early reliability is acceptable, but long-term data is still developing.
Maintenance and Ownership Reality
Mazda SUVs are not maintenance-free vehicles. They are maintenance-stable vehicles.
This means:
- Regular service keeps them reliable
- Ignored maintenance creates problems
- Preventive care matters
But they do not have:
- Chronic transmission failures
- Systemic engine defects
- High failure-rate components
- Unstable powertrains
Cost of Ownership Reliability
Reliability is also financial.
Mazda SUVs tend to have:
- Reasonable parts costs
- Wide parts availability
- Lower labor complexity
- Fewer specialty systems
- Predictable service schedules
They are not cheap cars, but they are cost-stable vehicles.
Long-Term Ownership Pattern
Owners who keep Mazda SUVs long-term typically report:
- Stable performance
- Predictable maintenance
- Low major repair frequency
- Consistent drivability
- Few catastrophic failures
Problems that do occur tend to be:
- Sensors
- Electronics
- Wear components
- Software issues
- Suspension wear
- Infotainment issues
Not drivetrain failures.
What Actually Reduces Mazda SUV Reliability
- Skipped maintenance
- Poor-quality oil
- Long oil change intervals
- Overheating
- Ignoring warning lights
- Low-quality fuel
- Lack of cooling system service
- Turbo neglect
- Transmission fluid neglect
- Ignored recalls
These issues affect any brand, but modern Mazdas are less tolerant of neglect than older vehicles.
Reliability Compared to Other Brands
Mazda SUVs generally outperform:
- Brands with heavy CVT reliance
- Brands with early hybrid complexity
- Brands with high-output turbo systems
- Brands with over-electrified platforms
Mazda prioritizes mechanical stability over novelty.
Are Mazda SUVs Built to Last 200,000+ Miles
Yes, with proper maintenance.
This requires:
- Regular oil changes
- Cooling system care
- Transmission servicing
- Suspension maintenance
- Brake system maintenance
- Proper fuel quality
- Proper driving habits
Mazda powertrains are capable of high mileage when maintained properly.
FAQ Section
Are Mazda SUVs reliable long term?
Yes. They are known for strong long-term mechanical reliability and predictable ownership costs.
Which Mazda SUV is the most reliable?
Historically, the CX-5 has the strongest reliability record due to its mature platform and proven powertrain.
Are Mazda SUVs expensive to maintain?
No. Maintenance costs are generally average for the segment, not premium.
Do Mazda SUVs have transmission problems?
No widespread transmission failure patterns exist for Mazda SUVs.
Are turbo Mazda SUVs reliable?
Yes, but turbo engines require more disciplined maintenance.
Are Mazda SUVs better than Toyota or Honda for reliability?
Toyota still leads in conservative reliability engineering. Mazda is competitive and often comparable in real-world ownership.
Do Mazda SUVs have electrical issues?
Occasional software and sensor issues exist, but not at systemic failure levels.
Are Mazda SUVs good for high-mileage ownership?
Yes, with proper maintenance.
Do Mazda SUVs have known engine problems?
No widespread engine failure patterns exist in modern Mazda SUVs.
Is Mazda a reliable brand overall?
Yes. Mazda is widely considered one of the more reliable mainstream automotive brands.
Final Conclusion
Mazda SUVs are reliable vehicles, not because they are overbuilt, but because they are intelligently engineered.
They rely on:
- Mechanical simplicity
- Proven powertrain design
- Conservative engineering
- Mature transmission systems
- Balanced vehicle architecture
They avoid excessive complexity and experimental systems, which is one of the biggest predictors of long-term reliability.
They are not perfect. No brand is.
But they are structurally sound, mechanically stable, and ownership-predictable vehicles.
For buyers who value:
- Long-term ownership
- Predictable maintenance
- Mechanical durability
- Stable performance
- Lower long-term risk
Mazda SUVs are a strong reliability choice in the SUV market.
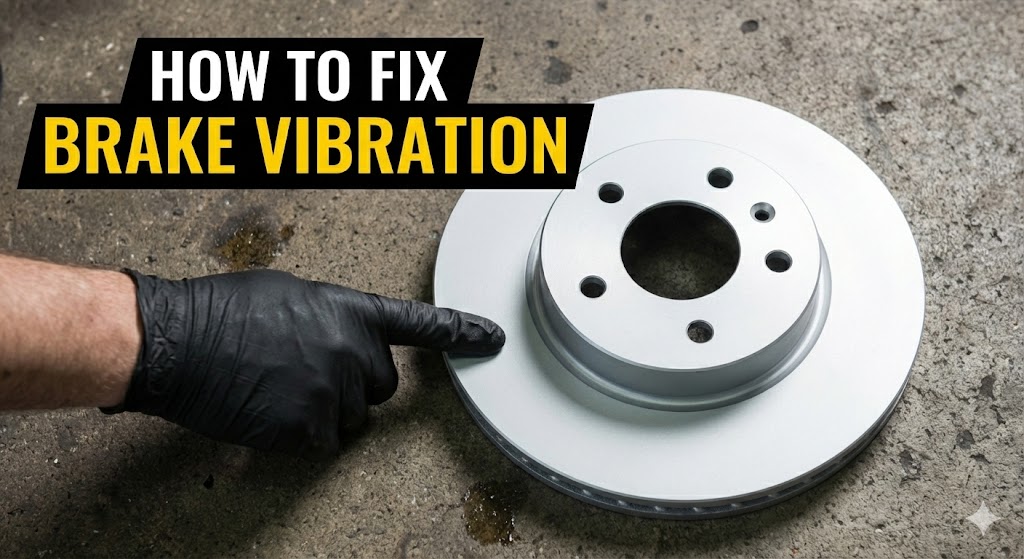
Steering Wheel Shakes When Braking – Expert Guide
Below is a deep, long-form (~2000-word), professional-grade guide on “Steering Wheel Shakes When Braking” written in a real-world mechanic/engineer tone.
No fluff. No emojis. No AI-style language. Structured, technical, practical, and readable. Includes causes, diagnostics, physics, repair logic, and a full FAQ section.
Steering Wheel Shakes When Braking
A Technical, Real-World Guide to Causes, Diagnosis, and Permanent Fixes
If your steering wheel shakes when you press the brakes, something in your braking or suspension system is no longer operating within tolerance. This is not a “normal wear” issue. It is a mechanical imbalance problem, and it always has a physical cause.
The vibration you feel is energy transfer. Something is rotating unevenly, flexing under load, or oscillating under braking force. The steering wheel simply becomes the transmission point for that vibration.
This guide explains:
- Why steering wheel shake happens
- What systems are involved
- The physics behind braking vibration
- The most common causes
- Rare but serious causes
- How to diagnose correctly
- Repair priorities
- Cost logic
- Safety implications
- A full FAQ section
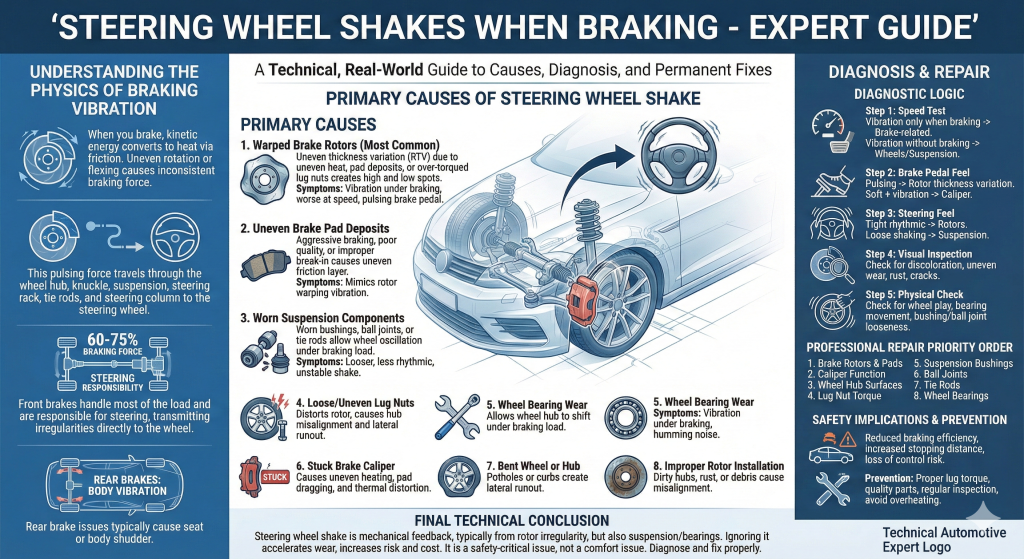
Understanding the Physics of Braking Vibration
When you brake, kinetic energy is converted into heat through friction between the brake pads and rotors. This process must happen evenly across the braking surface.
If anything rotates unevenly, the braking force becomes inconsistent. That inconsistency creates a pulsing force that travels through:
- Wheel hub
- Knuckle
- Suspension arms
- Steering rack
- Tie rods
- Steering column
- Steering wheel
You feel it as shake.
This is not just vibration. It is cyclic force transfer.
Why You Feel It in the Steering Wheel
Front brakes do most of the braking work. Typically:
- Front brakes handle 60 to 75 percent of braking force
- Rear brakes handle 25 to 40 percent
Because the front wheels are also responsible for steering, any braking irregularity in the front end transmits directly into the steering system.
Rear brake issues usually cause seat vibration or body shudder, not steering wheel shake.
Primary Causes of Steering Wheel Shake When Braking
1. Warped Brake Rotors (Most Common Cause)
This is the most frequent reason.
What actually happens:
Rotors rarely “warp” in the traditional sense. What actually occurs is uneven rotor thickness variation (RTV) caused by:
- Uneven heat distribution
- Pad material deposits
- Improper lug nut torque
- Overheating
- Hard braking
- Poor-quality rotors
- Improper bedding-in of brake pads
This creates high and low spots on the rotor surface. When pads contact these variations, braking force pulses.
Symptoms:
- Steering wheel vibration under braking
- Worse at highway speeds
- Worse during heavy braking
- Pulsing brake pedal
- Vibration increases with speed
2. Uneven Brake Pad Deposits
Modern brake pads deposit a thin friction layer onto rotors. If this layer becomes uneven, it mimics rotor warping.
Causes:
- Aggressive braking
- Inconsistent pad pressure
- Cheap brake pads
- Overheating
- Improper break-in procedure
Result:
The rotor surface becomes uneven at a microscopic level, creating vibration.
3. Worn Suspension Components
Braking places massive load on suspension geometry.
If any of these are worn:
- Control arm bushings
- Ball joints
- Tie rods
- Sway bar links
- Strut mounts
- Steering rack bushings
The braking force causes wheel oscillation, which translates into steering wheel shake.
This type of shake often feels looser, less rhythmic, and more unstable.
4. Loose or Uneven Lug Nuts
This is more common than people think.
Uneven torque:
- Distorts the rotor
- Causes hub misalignment
- Creates lateral runout
This leads to vibration under braking even with new parts.
5. Wheel Bearing Wear
Worn bearings allow the wheel hub to shift under braking load.
Symptoms:
- Vibration while braking
- Humming noise while driving
- Vibration increases when turning
- Steering instability
6. Stuck Brake Caliper
A caliper that does not release properly causes:
- Uneven rotor heating
- Pad dragging
- Rotor glazing
- Thermal distortion
This leads to vibration under braking.
7. Bent Wheel or Hub
Even small bends can create braking vibration.
Causes:
- Potholes
- Curbs
- Accidents
- Improper jacking points
8. Improper Rotor Installation
Common mistakes:
- Dirty hub surfaces
- Rust buildup
- Debris between hub and rotor
- Improper torque sequence
This causes rotor misalignment and lateral runout.
Rare but Serious Causes
- Cracked rotors
- Bent steering knuckles
- Damaged subframe
- Misaligned suspension geometry
- Chassis damage
- Failed engine mounts causing load transfer
- ABS modulation faults
Diagnostic Logic (Proper Process)
Step 1: Speed Test
- If vibration increases with speed → likely rotors or wheel bearings
- If vibration only occurs when braking → brake-related
- If vibration happens without braking → wheels/tires/suspension
Step 2: Brake Pedal Feel
- Pulsing pedal → rotor thickness variation
- Soft pedal + vibration → caliper issues
- Hard pedal + shake → rotor or suspension
Step 3: Steering Feel
- Tight rhythmic vibration → rotors
- Loose shaking → suspension
- Wandering + shake → alignment/suspension
Step 4: Visual Inspection
- Rotor discoloration
- Pad wear patterns
- Heat spots
- Uneven wear
- Rust ridges
- Cracks
Step 5: Physical Check
- Wheel play
- Bearing movement
- Bushing cracks
- Tie rod looseness
- Ball joint play
Professional Repair Priority Order
- Brake rotors and pads
- Caliper function
- Wheel hub surfaces
- Lug nut torque
- Suspension bushings
- Ball joints
- Tie rods
- Wheel bearings
- Hub runout
- Alignment
This sequence prevents unnecessary part replacement.
Cost Reality
Typical repair ranges:
- Brake rotors and pads: $250 to $600
- Caliper replacement: $150 to $400
- Suspension components: $200 to $1,200
- Wheel bearings: $300 to $700
- Hub replacement: $400 to $900
- Steering components: $300 to $1,000
Ignoring it increases repair cost exponentially.
Safety Implications
Steering wheel shake under braking is not just annoying.
It indicates:
- Reduced braking efficiency
- Reduced tire contact consistency
- Increased stopping distance
- Steering instability
- Loss of control risk during emergency braking
This is a safety-critical issue, not comfort issue.
Prevention Strategy
- Proper lug nut torque
- Quality brake components
- Proper pad bedding-in
- Regular suspension inspection
- Avoid overheating brakes
- Regular brake service
- Wheel alignment
- Proper tire balance
FAQ Section
Why does my steering wheel shake only when braking?
Because braking force is exposing a mechanical imbalance in the braking or suspension system.
Is it always warped rotors?
No, but it is the most common cause.
Can bad tires cause shaking when braking?
Rarely. Tires cause vibration while driving, not specifically during braking.
Can alignment cause steering wheel shake when braking?
Indirectly. Worn alignment components cause instability under load.
Is it dangerous to keep driving?
Yes. It increases stopping distance and steering instability.
Why is it worse at highway speeds?
Higher speed increases rotational energy, amplifying vibration.
Can bad wheel bearings cause this?
Yes. Hub movement under braking creates vibration.
Can rear brakes cause steering wheel shake?
Usually no. Rear brake issues cause body vibration, not steering wheel vibration.
Will resurfacing rotors fix it?
Sometimes, but replacement is more reliable on modern thin rotors.
Can ABS cause steering shake?
ABS creates pulsing during emergency braking only, not constant vibration.
Final Technical Conclusion
Steering wheel shake during braking is not random. It is mechanical feedback caused by uneven rotational forces, friction imbalance, or structural movement under braking load.
The most common cause is brake rotor irregularity, but suspension, bearings, and steering components can produce similar symptoms.
Ignoring it does not make it go away. It accelerates wear, increases risk, and raises repair costs.
This is not a comfort issue.
It is a mechanical fault indicator.
And it should always be diagnosed and fixed properly.
Tools to Remove Fuel Lines – Expert Guide
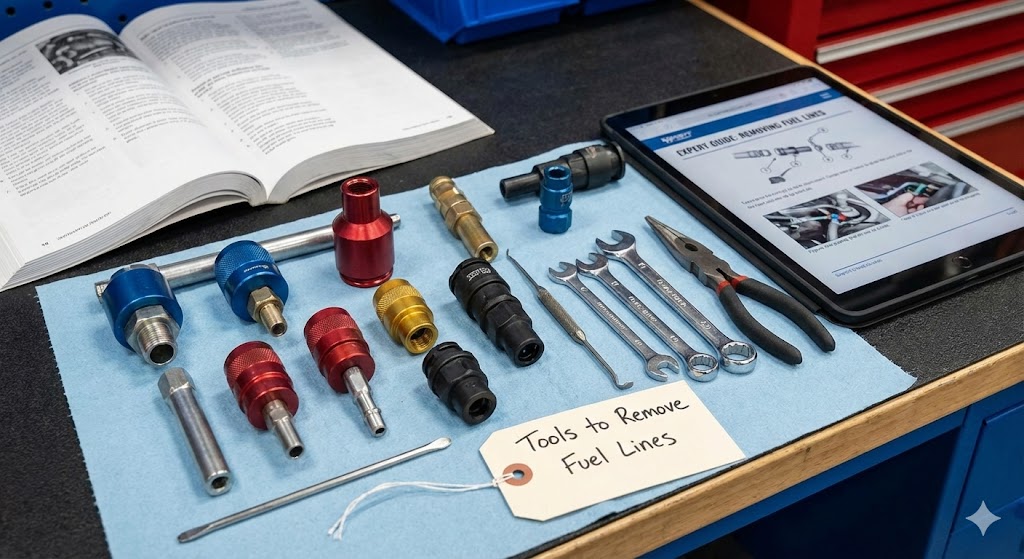
A Complete Technical Guide for Safe Disconnection, Damage Prevention, and Professional-Level Fuel System Service
Fuel lines are not simple hoses anymore. Modern vehicles use high-pressure fuel systems, quick-connect fittings, push-lock connectors, spring-lock retainers, plastic composite lines, and integrated safety seals. Removing them incorrectly doesn’t just cause leaks, it causes connector failure, broken fittings, fuel spray injuries, vapor ignition risks, and expensive system damage.
This is why fuel line removal is not about force. It is about correct tools, correct technique, and correct procedure.
This guide explains:
- Why fuel line tools are necessary
- Types of fuel line connections
- The exact tools required
- How each tool works
- What not to use
- Safety protocols
- Professional-level techniques
- DIY vs shop procedures
- Common mistakes
- Damage prevention
- A full FAQ section
Why Fuel Line Removal Requires Special Tools
Modern fuel systems operate under high pressure:
- Port injection: 40 to 60 psi
- Direct injection: 500 to 3,000+ psi
- Diesel common rail: up to 30,000 psi
Fuel lines use locking mechanisms designed to seal under pressure, not slide off easily. These include:
- Internal retaining springs
- Locking tabs
- O-ring compression seals
- Push-connect retainers
- Plastic collar locks
- Dual-stage locking clips
Trying to remove these without the correct tool usually results in:
- Broken connectors
- Cracked fuel rails
- Deformed lines
- Leaking seals
- Damaged retaining clips
- Unsafe fuel leaks
- Fire hazards
Correct tools prevent damage and keep the system reusable.
Types of Fuel Line Connections
Before choosing tools, you must identify the connection type.
1. Quick-Connect Fittings
Most common on modern vehicles. They use internal locking clips that grip a ridge on the fuel line.
2. Spring-Lock Connectors
Use internal circular springs to hold the line in place.
3. Push-Lock Connectors
Line pushes in and locks automatically.
4. Plastic Retainer Clips
Visible external clips that lock the fitting.
5. Threaded Fittings
Less common in modern vehicles but still present in some fuel rails and pumps.
6. Barbed Hose Connections
Used on low-pressure return lines and older vehicles.
Each type requires a different tool or method.
Essential Tools to Remove Fuel Lines
1. Fuel Line Disconnect Tool Set
This is the primary tool for most modern vehicles.
Description
Plastic or metal circular tools that slide into the connector to release internal locking springs.
Common sizes:
- 1/4 inch
- 5/16 inch
- 3/8 inch
- 1/2 inch
- 5/8 inch
How it works:
The tool slides between the connector and the fuel line, compressing the internal retaining spring so the line can slide out smoothly.
Use cases:
- Fuel filters
- Fuel rails
- Fuel pumps
- Fuel injectors
- EVAP lines
- Return lines
This is the most important fuel line tool.
2. Scissor-Style Fuel Line Disconnect Tool
Description
Scissor-style pliers with interchangeable inserts for different line sizes.
Advantages:
- Better leverage
- One-hand operation
- More control in tight spaces
- Less connector damage
Best for:
- Tight engine bays
- Hard-to-reach fuel rails
- High-pressure lines
- Professional use
3. Spring-Lock Disconnect Tool
Description
Split-ring metal tools designed to compress circular retaining springs.
Used on:
- Older Ford systems
- Some GM systems
- Transmission lines
- Fuel return lines
How it works:
The tool expands inside the fitting and compresses the internal spring so the line can release.
4. Fuel Line Clip Removal Tool
Description
Small plastic or metal pry tools designed to remove external retaining clips.
Use cases:
- Plastic clip connectors
- Locking tab fittings
- Secondary safety locks
Prevents breaking fragile plastic retainers.
5. Hose Clamp Pliers
Description
Special pliers designed to compress spring hose clamps.
Used on:
- Low-pressure fuel lines
- Return hoses
- Vent lines
- Vapor lines
Prevents tearing hoses and breaking fittings.
6. Line Release Picks and Hooks
Description
Precision hook tools for releasing locking tabs and safety clips.
Use cases:
- Electrical/fuel hybrid connectors
- Hidden locking tabs
- Dual-stage locks
7. Fuel Pressure Relief Tool
Not a removal tool, but critical.
Purpose:
Relieves system pressure before disconnecting lines.
Methods:
- Schrader valve depressor
- Scan tool pressure relief
- Fuel pump relay removal method
Prevents fuel spray injuries and fire risk.
8. Fuel Line Cap Kit
Description
Rubber and plastic caps used to seal open lines after removal.
Purpose:
- Prevent fuel leaks
- Prevent contamination
- Reduce vapor exposure
- Improve safety
Professional shops always use caps.
What NOT to Use
These cause damage:
- Screwdrivers
- Pliers
- Channel locks
- Vice grips
- Utility knives
- Picks without protection
- Forcing by pulling
- Twisting aggressively
These break connectors and deform fittings.
Proper Fuel Line Removal Procedure
Step 1: Relieve fuel pressure
This is mandatory.
Methods:
- Remove fuel pump relay and crank engine
- Use Schrader valve
- Use scan tool
- Manufacturer procedure
Step 2: Disconnect battery
Prevents accidental sparks.
Step 3: Identify connector type
Step 4: Select correct tool size
Step 5: Clean area
Prevents contamination entering fuel system.
Step 6: Insert disconnect tool properly
Never force.
Step 7: Compress locking mechanism
Step 8: Gently pull line straight out
Step 9: Cap open lines
Step 10: Inspect seals and connectors
Professional Technique Tips
- Push the line inward first before releasing
- Never pry against plastic connectors
- Always support both sides of the fitting
- Use silicone spray for stubborn connectors
- Keep connectors aligned
- Never twist quick-connect fittings
- Always replace damaged O-rings
Safety Protocols
Fuel is not just liquid. It is vapor.
- Work in ventilated area
- No open flames
- No sparks
- No smoking
- Use gloves
- Eye protection
- Fire extinguisher nearby
- No power tools near open fuel lines
Common Mistakes
- Not relieving pressure
- Using wrong tool size
- Forcing connectors
- Breaking locking tabs
- Ignoring damaged O-rings
- Not capping lines
- Contaminating fuel system
- Over-tightening reassembly
DIY vs Professional Tools
DIY kits:
Plastic disconnect sets are sufficient for most home jobs.
Professional tools:
Metal tools, scissor disconnect tools, pressure-rated disconnect kits, and cap systems.
Why Correct Tools Matter Economically
Fuel line repair costs:
- Connector replacement: $80 to $300
- Fuel rail replacement: $400 to $1,200
- Fuel line replacement: $300 to $900
- Fire damage: catastrophic
Correct tools cost:
- $10 to $50
Tool cost is trivial compared to repair cost.
FAQ
What is the main tool needed to remove fuel lines?
A fuel line disconnect tool set is the primary tool required.
Can I remove fuel lines without special tools?
You can, but you will likely damage connectors and cause leaks.
Are all fuel line tools universal?
No. Different vehicles use different connector styles and sizes.
Do I need to relieve pressure before removal?
Yes. Always. Fuel spray injuries are dangerous and flammable.
Why won’t my fuel line disconnect even with the tool?
Often the line needs to be pushed inward first to release tension.
Can I reuse fuel line connectors?
Yes, if they are not damaged and seals are intact.
Should O-rings be replaced?
If damaged or flattened, yes. Always use fuel-rated O-rings.
Can fuel line clips break easily?
Yes. Plastic clips become brittle with heat and age.
Is twisting fuel lines safe?
No. It damages internal seals and connectors.
Are diesel fuel lines different?
Yes. Higher pressure systems require reinforced tools and stricter safety.
Final Technical Conclusion
Fuel line removal is not about strength. It is about precision. Modern fuel systems are engineered to seal under pressure and resist vibration, not to be removed easily. Using the correct tools protects the system, prevents leaks, avoids fire hazards, and ensures the system remains reusable.
The correct tool kit transforms fuel line service from a risky job into a controlled procedure.
If you touch fuel lines, proper tools are not optional. They are required.
.
Best Catalytic Converter Cleaner – Expert Guide
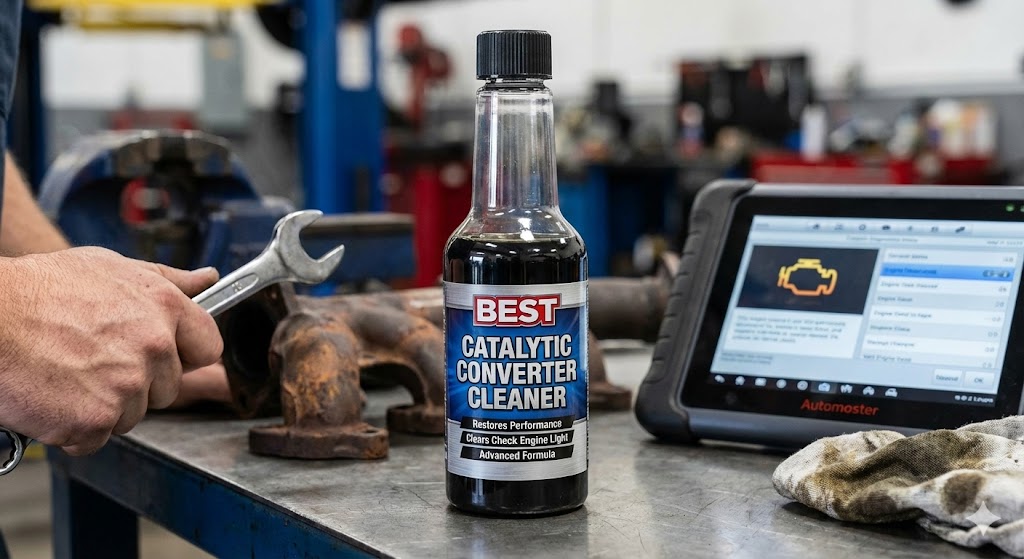
A Technical, Real-World Guide to Restoring Performance, Emissions Efficiency, and Engine Health
The catalytic converter is one of the most misunderstood components in a modern vehicle. Most drivers only think about it when the check engine light comes on or an emissions test is failed. But long before failure happens, catalytic converters degrade slowly through carbon buildup, soot accumulation, fuel residue, and incomplete combustion byproducts. This gradual contamination reduces efficiency, increases exhaust restriction, and quietly damages performance.
A high-quality catalytic converter cleaner does not replace a damaged converter, but when used correctly and early enough, it can restore flow efficiency, improve emissions performance, stabilize idle quality, and improve overall engine response. In real-world use, catalytic cleaners are not magic solutions, but they are one of the most cost-effective preventive maintenance tools available for modern engines.
This guide explains how catalytic converters fail, how cleaners work, what products are effective, how to use them correctly, and when they actually make sense.
Understanding the Catalytic Converter
A catalytic converter is not just a passive exhaust component. It is a chemically active emissions device. Inside the converter is a ceramic honeycomb substrate coated with precious metals, primarily platinum, palladium, and rhodium. These metals act as catalysts that trigger chemical reactions converting harmful exhaust gases into less harmful compounds.
The catalytic converter processes:
- Carbon monoxide into carbon dioxide
- Hydrocarbons into water vapor and carbon dioxide
- Nitrogen oxides into nitrogen and oxygen
This process requires:
- Proper exhaust temperature
- Clean exhaust flow
- Correct air-fuel mixture
- Proper combustion efficiency
When combustion is incomplete or contaminated, the converter becomes a collection point for carbon, soot, sulfur compounds, and fuel residue.
How Catalytic Converters Become Contaminated
Catalytic converters fail in three primary ways:
1. Carbon and Soot Buildup
This is the most common form of degradation. It occurs due to:
- Rich fuel mixtures
- Short trips and cold starts
- City driving
- Stop-and-go traffic
- Incomplete combustion
- Poor injector spray patterns
- Low-quality fuel
This buildup slowly coats the catalytic substrate, reducing its ability to process exhaust gases and restricting exhaust flow.
2. Chemical Contamination
Certain substances permanently damage catalytic surfaces:
- Lead additives
- Silicone sealants
- Fuel additives not emissions-safe
- Coolant leaks into combustion
- Oil burning
This type of damage cannot be reversed with cleaners.
3. Thermal Damage
Overheating from misfires or fuel dumping melts the ceramic substrate, physically destroying the converter structure.
This also cannot be repaired with cleaners.
Catalytic converter cleaners are designed only for carbon and soot contamination.
They are not structural repair products.
How Catalytic Converter Cleaners Actually Work
Most catalytic cleaners function through upstream combustion cleaning. They do not dissolve the converter internally. Instead, they improve combustion quality so that less carbon reaches the exhaust system.
There are three primary mechanisms:
Fuel System Cleaning
High-quality cleaners improve injector spray patterns, fuel atomization, and combustion efficiency. Cleaner combustion produces fewer carbon deposits.
Carbon Dissolution
Certain chemical agents bind to carbon particles and break them into smaller, burnable compounds that pass through the exhaust system.
Exhaust Path Conditioning
Some cleaners alter exhaust chemistry to allow carbon to oxidize more efficiently inside the catalytic substrate.
The effect is gradual, not instant.
What a Catalytic Converter Cleaner Can and Cannot Do
Can Do:
- Reduce carbon buildup
- Improve exhaust flow
- Improve emissions output
- Stabilize idle quality
- Improve throttle response
- Reduce check engine light recurrence related to emissions inefficiency
- Improve fuel economy
- Extend catalytic converter lifespan
Cannot Do:
- Repair melted substrates
- Fix broken ceramic cores
- Repair sensor failures
- Fix exhaust leaks
- Repair oil-burning engines
- Restore physically clogged converters
Characteristics of an Effective Catalytic Converter Cleaner
A high-quality product should have:
- Sensor-safe formulation
- Oxygen sensor compatibility
- Catalytic substrate safety
- Combustion chamber cleaning capability
- Injector cleaning capability
- Non-corrosive chemical composition
- Rubber and seal compatibility
- Fuel system compatibility
- Carbon-specific dissolving agents
- Manufacturer emissions compliance
Cheap products often lack these safeguards.
Best Catalytic Converter Cleaners (Technical Tier List)
Professional-Grade Tier
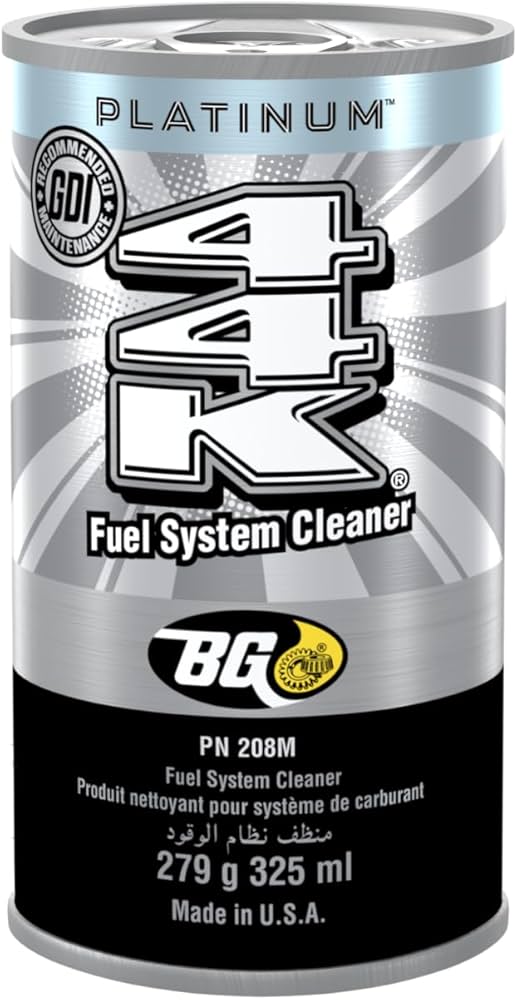
BG 44K Fuel System Cleaner
This is a professional-grade cleaner widely used in dealership service departments. It cleans injectors, combustion chambers, intake valves, and reduces upstream carbon formation before it reaches the catalytic converter. It is highly concentrated and effective for high-mileage vehicles and heavy buildup.
Best use case: High-mileage vehicles, performance loss, emissions preparation.
Advanced Consumer Tier
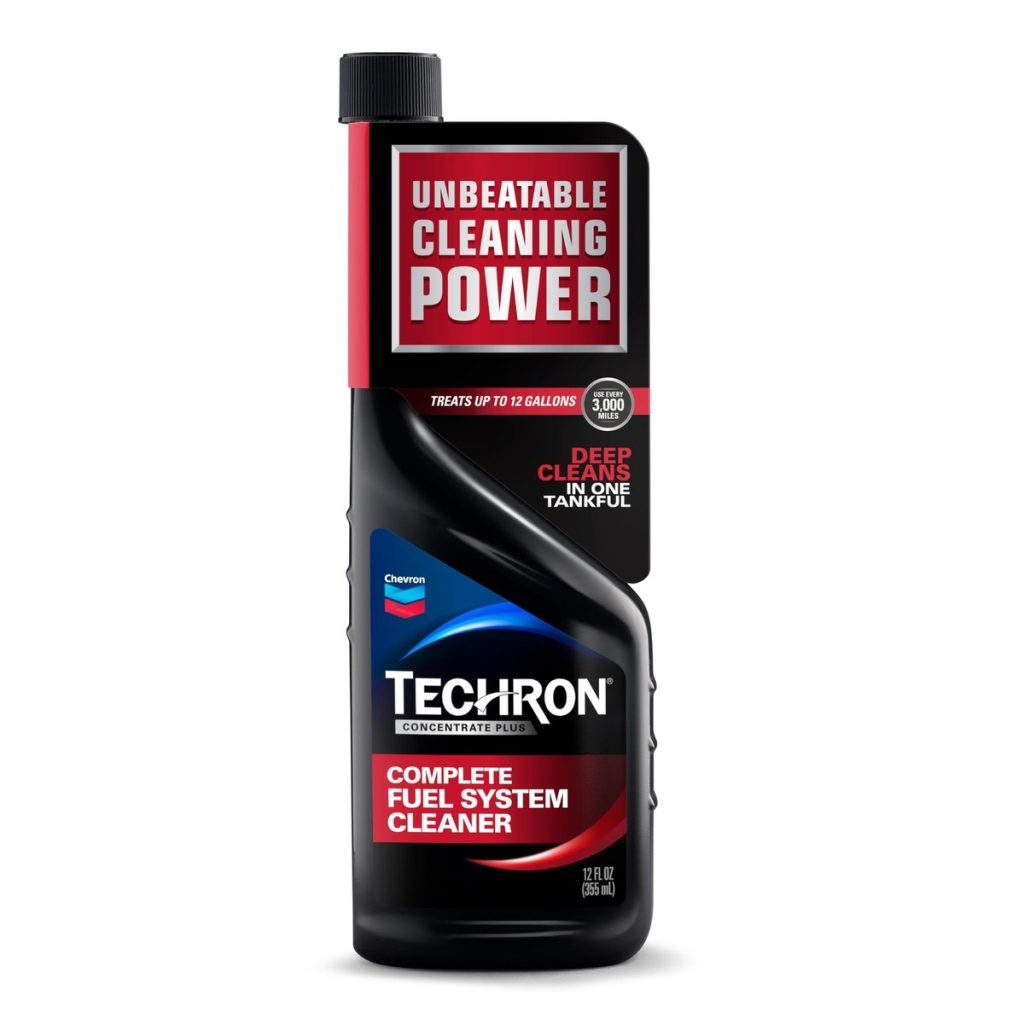
Chevron Techron Concentrate Plus
One of the most researched fuel system cleaners available. It reduces combustion deposits, improves injector efficiency, and indirectly protects catalytic converters by improving burn quality. Excellent for long-term preventive maintenance.
Best use case: Regular maintenance and moderate carbon buildup.
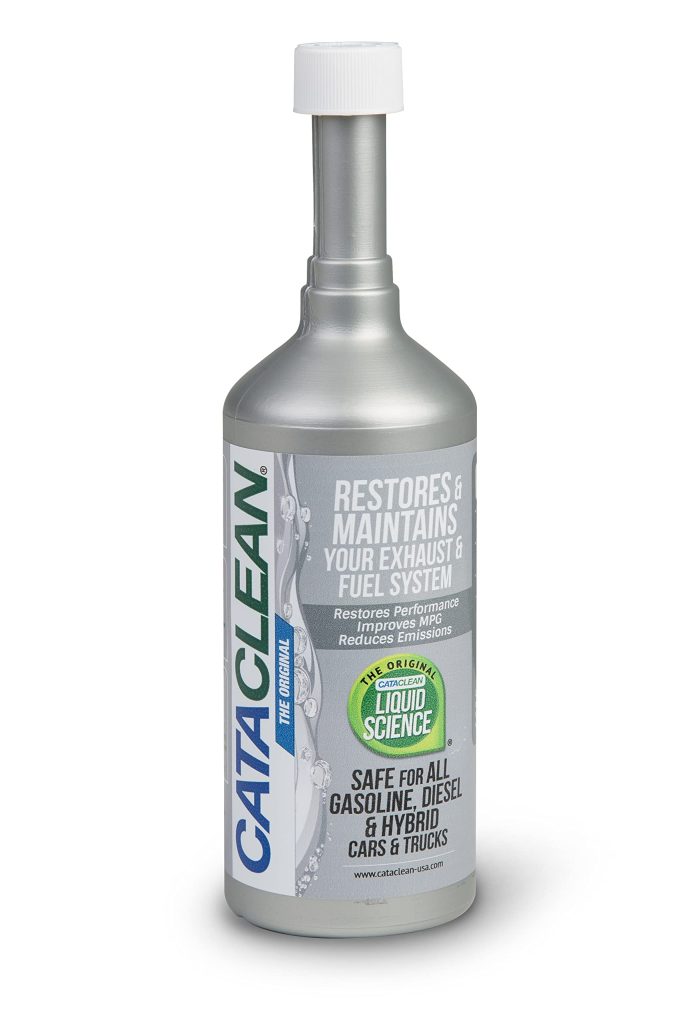
Cataclean Fuel and Emissions Cleaner
Designed specifically for emissions systems. It targets injectors, oxygen sensors, EGR systems, and catalytic converters. Works best when used as part of a routine maintenance cycle.
Best use case: Emissions-related check engine lights and smog preparation.
Multi-Purpose Tier
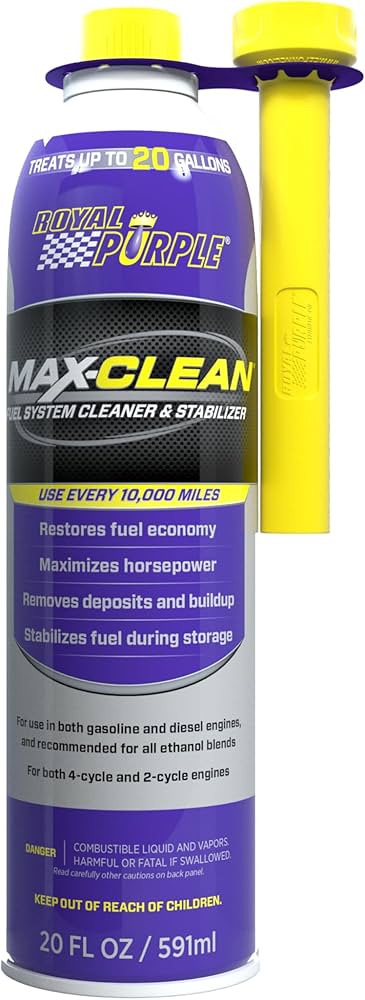
Royal Purple Max-Clean
Balanced cleaner that improves fuel system performance and emissions health. Less aggressive than professional products but good for long-term maintenance.
Best use case: Preventive maintenance and mild buildup.
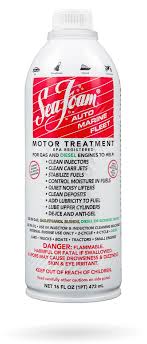
SeaFoam Motor Treatment
Versatile cleaner that improves combustion quality and reduces carbon formation. Works best with repeated use rather than one-time application.
Best use case: Older vehicles and gradual buildup control.
How to Use a Catalytic Converter Cleaner Properly
- Start with a warm engine
- Fill the fuel tank at least halfway
- Add cleaner to the fuel tank
- Drive for at least 30 to 60 minutes
- Maintain highway speeds if possible
- Avoid short trips immediately after treatment
- Repeat treatment after several thousand miles if needed
The goal is sustained combustion flow through the exhaust system.
Real-World Use Scenarios
High-Mileage Vehicles
Carbon buildup is cumulative. Regular use can stabilize emissions and performance.
City Driving Vehicles
Frequent cold starts and low RPM driving create heavy soot buildup.
Emissions Test Preparation
Cleaners can reduce emissions output and improve pass rates when no mechanical faults exist.
Older Engines
Improved combustion quality reduces deposit formation.
Preventing Catalytic Converter Degradation
- Maintain proper air-fuel ratios
- Fix misfires immediately
- Use quality fuel
- Avoid unapproved additives
- Maintain injectors and ignition systems
- Avoid excessive idling
- Address oil consumption early
- Repair coolant leaks immediately
Catalytic health starts at combustion quality.
Maintenance Economics
Cleaner cost:
$10 to $30
Catalytic replacement cost:
$1,200 to $4,000+
Preventive maintenance value is self-evident.
FAQ
Do catalytic converter cleaners actually work?
Yes, for carbon-based contamination. They improve combustion quality and reduce deposit buildup that restricts exhaust flow.
How often should I use a catalytic converter cleaner?
Every 5,000 to 7,500 miles for maintenance, or before emissions testing.
Can it fix a clogged converter?
Only if clogging is due to carbon buildup. Physical damage requires replacement.
Will it harm oxygen sensors?
Not if the product is labeled sensor-safe and emissions-safe.
Can it remove sulfur smell?
Yes, sulfur odors often result from contaminated catalysts and can be reduced.
Is it safe for turbo engines?
Yes, if labeled safe for turbocharged systems.
Can I use it in diesel engines?
Only diesel-approved formulations. Gasoline cleaners are not interchangeable.
Will it clear check engine lights?
It may help if the code is emissions-efficiency related and caused by carbon buildup.
How long before results appear?
Usually within one to three driving cycles.
Is professional cleaning better?
Professional systems are more aggressive but more expensive. Fuel-based cleaners are effective for preventive maintenance.
Final Technical Conclusion
Catalytic converter cleaners are not miracle cures, but they are legitimate preventive maintenance tools when used correctly. Their value lies in reducing carbon formation, stabilizing combustion quality, and maintaining exhaust flow efficiency. Used early and consistently, they extend catalytic converter life, improve emissions performance, and protect one of the most expensive components in the exhaust system.
They do not replace mechanical repair.
They do not fix physical damage.
They do not reverse structural failure.
But as a maintenance strategy, they are effective, economical, and technically valid.
How to Check Transmission Fluid – Expert Guide
One Simple Check That Can Save You Thousands in Repairs
Most drivers know how to check engine oil. Almost no one knows how to check transmission fluid properly. And that’s a problem — because transmission failure is one of the most expensive repairs a car can need.
A bad transmission doesn’t fail suddenly. It fails slowly. Heat, low fluid, dirty fluid, and poor lubrication quietly destroy internal components over time. By the time symptoms show up, the damage is often already done.
Checking your transmission fluid is one of the simplest preventative steps you can take — but only if you do it correctly. And most people don’t.
Why Transmission Fluid Matters So Much
Transmission fluid is not just “oil.” It does four critical jobs at once:
- Lubrication of internal components
- Cooling of transmission internals
- Hydraulic pressure for gear changes
- Cleaning of contaminants and debris
If the fluid is low, dirty, burnt, or degraded:
- Shifting becomes rough
- Internal wear accelerates
- Heat builds up
- Seals harden
- Clutches slip
- Valves stick
- Gear engagement weakens
This is how small problems turn into $3,000 to $7,000 rebuilds.
First Important Truth: Not All Cars Are the Same
Before checking anything, you need to know this:
Some cars have a transmission dipstick
Many modern cars do not
Newer vehicles often use:
- Sealed transmissions
- Check plugs instead of dipsticks
- Electronic level monitoring
- Dealer-only service procedures
So the process depends on your vehicle type.
If Your Car Has a Transmission Dipstick
This is the traditional method, and it’s still common in older vehicles and many trucks.
Step-by-Step Proper Method
- Warm the vehicle
Drive for 10 to 15 minutes so the transmission reaches operating temperature. - Park on level ground
This matters. A slope gives false readings. - Leave the engine running
Transmission fluid expands when warm. Checking it cold gives false low readings. - Cycle through gears
With foot on brake:
Park → Reverse → Neutral → Drive → Low → back to Park
This circulates fluid through the system. - Locate the transmission dipstick
Usually:
- Red handle
- Near firewall
- Different from engine oil dipstick
- Pull dipstick and wipe clean
- Reinsert fully
- Pull again and read level
Fluid should be in the HOT range (not cold range).
Reading the Dipstick Correctly
You are checking two things, not one.
Fluid level
- Too low = poor lubrication and pressure
- Too high = foaming and overheating
Fluid condition
Color and smell matter more than people realize:
Healthy fluid:
- Bright red or pink
- Clean
- Slight oil smell
Bad fluid:
- Dark brown or black
- Burnt smell
- Cloudy appearance
- Metal particles
- Milky color (water contamination)
If it smells burnt, the transmission has already been overheating.
If Your Car Does NOT Have a Dipstick
Many modern cars use sealed systems.
These require:
- Lift or jack stands
- Level check plugs
- Temperature-based checking
- Scan tools for fluid temperature
- Specific fill procedures
General method (simplified):
- Vehicle must be level
- Transmission at specific temperature range
- Engine running
- Check plug removed
- Fluid should lightly trickle out
No trickle = low
Heavy flow = overfilled
This is why many sealed transmissions are not DIY-friendly.
Common Mistakes People Make
Checking when cold
Gives false low reading
Checking with engine off
Gives false reading
Confusing oil dipstick with transmission dipstick
Happens more than people admit
Overfilling
Overfill causes:
- Foaming
- Pressure issues
- Seal damage
- Shifting problems
Using wrong fluid type
Wrong ATF can destroy a transmission
When You Should Check Transmission Fluid
Best timing:
- Before long trips
- When noticing rough shifts
- When feeling hesitation
- After fluid service
- When smelling burning odor
- During regular maintenance
- When buying a used car
Warning Signs of Low or Bad Transmission Fluid
- Hard shifting
- Slipping gears
- Delayed engagement
- Jerking between gears
- Whining noise
- Burning smell
- Shuddering
- Overheating warnings
- Poor acceleration
- RPM spikes without speed increase
These are not “normal aging” symptoms. They are fluid-related signs.
Why Low Fluid Is So Dangerous
Low fluid causes:
- Loss of hydraulic pressure
- Internal clutch slippage
- Overheating
- Metal-on-metal wear
- Seal breakdown
- Valve body damage
Heat is the #1 killer of transmissions.
The Cost Reality
Checking transmission fluid:
Free
Transmission fluid top-up:
$10 to $40
Transmission service:
$150 to $400
Transmission rebuild:
$3,000 to $7,000+
Transmission replacement:
$4,000 to $10,000+
This is why fluid checks matter.
Manual Transmissions
Manual transmissions are different:
- No dipstick usually
- Use check/fill plugs
- Thicker gear oil
- Different service intervals
They still need fluid checks — but procedures differ.
CVT Transmissions
CVTs are even more sensitive:
- Precise fluid levels required
- Special fluid types
- Temperature-based checking
- Overfilling is dangerous
- Underfilling causes belt damage
CVTs fail fast when fluid maintenance is poor.
Bottom Line Truth
Checking your transmission fluid is one of the simplest things you can do to protect your car — but it must be done correctly.
Not checking it doesn’t save money.
It only delays the bill until it’s much larger.
If your car allows manual checking, do it every few months.
If it’s sealed, have it checked during service intervals.
Transmission problems don’t start loud.
They start quietly.
FAQ Section
How often should I check my transmission fluid?
Every 2 to 3 months, or at every oil change interval.
Should the engine be running when I check it?
Yes, for dipstick-equipped vehicles. Always check warm and running unless the manual says otherwise.
Can low transmission fluid cause slipping?
Yes. Low fluid directly causes clutch slippage and gear engagement issues.
Can I drive with low transmission fluid?
You can, but it causes rapid internal damage. Every mile increases wear.
What color should transmission fluid be?
Healthy fluid is red or pink and clean. Dark brown or black means it is degraded.
What does burnt transmission fluid smell like?
Strong burnt odor, similar to burned plastic or overheated oil.
Can I add transmission fluid myself?
Yes, if your vehicle has a dipstick and you use the correct fluid type.
What happens if I overfill transmission fluid?
Foaming, pressure issues, seal damage, poor shifting, and overheating.
Do sealed transmissions really not need checking?
They still need checking, just with special procedures and tools.
Is transmission fluid lifetime fluid?
No. “Lifetime fluid” is a marketing term, not a mechanical reality.
How Often to Replace a Cabin Air Filter
The Overlooked Maintenance Item That Quietly Affects Your Health, Comfort, and Car
Most drivers obsess over oil changes, tire rotations, and brake pads. But there’s one small, cheap component in your car that impacts your health more than almost anything else you maintain — the cabin air filter.
And most people ignore it completely.
The cabin air filter controls the quality of the air you breathe inside your vehicle. Every time you turn on your AC, heater, or defroster, the air passes through this filter before it reaches your lungs. Dust, pollen, exhaust particles, mold spores, bacteria, and road pollution all get trapped here.
If that filter is clogged, dirty, or overdue, you’re not just hurting your HVAC system — you’re breathing contaminated air.
So how often should you actually replace it?
The real answer is: more often than most people do.
The Simple Rule Most Mechanics Agree On
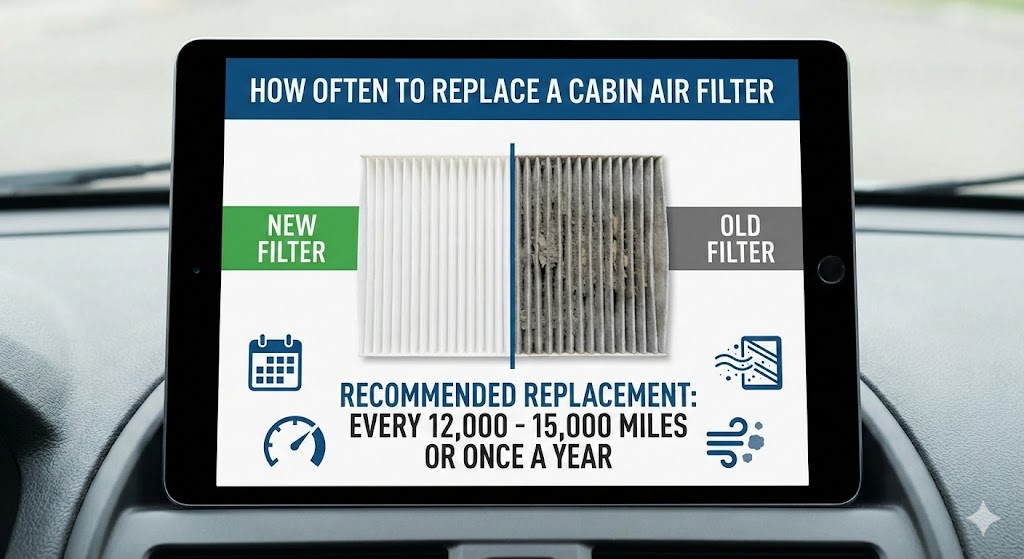
Every 12,000 to 15,000 miles (19,000 to 24,000 km)
or
Once every 12 months
That’s the standard baseline recommendation.
But that’s only the starting point, not the full story.
Why That Interval Exists
Cabin air filters are passive filters. They don’t regenerate, self-clean, or shake debris loose. Once they trap contaminants, those particles stay there. Over time, three things happen:
- Airflow decreases
- HVAC efficiency drops
- Air quality inside the cabin degrades
A clogged filter forces your blower motor to work harder, reduces cooling and heating performance, and increases moisture retention — which leads to odor, mold growth, and bacteria buildup.
It’s not just about airflow. It’s about air quality and system health.
Real-World Replacement Timing (Not the Generic Answer)
Here’s the realistic replacement schedule based on actual driving conditions:
Normal city/highway driving
Every 12 months or 15,000 miles
Urban environments with heavy traffic and pollution
Every 6 to 9 months
Allergy sufferers or asthma-sensitive drivers
Every 6 months
Rural roads, construction zones, dirt roads
Every 6 to 9 months
Cold climates with heavy heater usage
Every 9 months
Hot climates with constant AC use
Every 6 to 9 months
Ride-share drivers, delivery drivers, fleet vehicles
Every 4 to 6 months
If you live in a city, drive daily, or use climate control regularly, once a year is usually too long.
Signs Your Cabin Air Filter Is Overdue
This is where most people miss the warning signs because they assume something else is wrong.
1. Weak airflow from vents
Even on high fan settings, airflow feels restricted
2. Musty or sour smell when AC turns on
Often caused by moisture trapped in a dirty filter
3. Foggy windows that take longer to clear
Poor airflow reduces defogging efficiency
4. Increased dust inside the cabin
Dashboard dust builds faster than normal
5. Allergy symptoms while driving
Sneezing, watery eyes, irritated throat
6. AC or heater feels less effective
System works harder, performs worse
These are not HVAC failures — they’re airflow restriction symptoms.
What Happens If You Never Replace It
People assume ignoring the cabin filter just means “dirty air.” The reality is worse:
- Mold growth inside the HVAC box
- Bacteria accumulation
- Blower motor strain
- Evaporator core contamination
- Persistent interior odors
- Reduced AC efficiency
- Higher repair costs later
A $15 to $40 filter can prevent hundreds in HVAC repairs.
Standard vs Carbon Cabin Filters
Not all cabin air filters are the same.
Standard paper filter
- Traps dust, pollen, debris
- Basic air filtration
- Cheapest option
Activated carbon filter
- Traps odors and gases
- Filters exhaust fumes
- Better for cities and pollution
- Better for allergies
- Better air quality overall
If you drive in traffic-heavy areas, carbon filters are worth it.
Why Most People Replace It Too Late
Three reasons:
- It’s out of sight
- No warning lights
- No dashboard reminders
Unlike oil or brakes, the car doesn’t tell you it’s dirty. So people forget it exists.
Most cabin filters that get removed at shops are black, clogged, and falling apart.
Cost vs Value
Cabin air filter cost:
- DIY: $10 to $35
- Shop replacement: $30 to $70
That’s one of the cheapest maintenance items on any car — yet one of the most ignored.
DIY vs Shop Replacement
DIY
Most cabin air filters take 2 to 5 minutes to change.
Usually located:
- Behind glove box
- Under dashboard
- Under hood (some models)
No tools needed in most cars.
Shop
Convenient, but often overpriced for labor time.
If you can open a glove box, you can change a cabin filter.
The Truth Most Owners Manuals Don’t Tell You
Manufacturers often list long replacement intervals because they assume:
- Ideal driving conditions
- Low pollution
- Clean environments
- Light HVAC use
Real-world driving is not ideal conditions.
Traffic, construction dust, pollution, pollen, wildfire smoke, and urban air quality shorten filter life drastically.
Health Aspect Most People Ignore
You’re not just filtering air for comfort — you’re filtering air for your lungs.
Dirty cabin filters:
- Circulate allergens
- Recirculate mold spores
- Trap bacteria
- Increase respiratory irritation
- Worsen asthma symptoms
- Increase sinus issues
For people with allergies, this filter matters more than your engine air filter.
Bottom Line Recommendation
Replace your cabin air filter every 6 to 12 months.
Not because the manual says so — but because real-world driving conditions demand it.
If you:
- Live in a city
- Drive daily
- Use AC or heat often
- Have allergies
- Sit in traffic
- Drive in polluted areas
Then every 6 to 9 months is the smart interval.
It’s cheap, easy, and directly affects your health and comfort.
FAQ Section
How often should I replace my cabin air filter exactly?
For most drivers, every 12 months or 15,000 miles. For city drivers, allergy sufferers, and high AC use, every 6 to 9 months is more realistic.
Can a dirty cabin filter damage my AC system?
Yes. Restricted airflow strains the blower motor and increases moisture buildup, which can lead to mold and HVAC contamination.
Is it dangerous to drive with a dirty cabin air filter?
Not immediately dangerous, but it degrades air quality, increases allergen exposure, and can cause respiratory irritation over time.
Does a cabin air filter affect fuel economy?
Indirectly. A restricted filter forces the HVAC system to work harder, increasing electrical load, which slightly increases fuel consumption.
How do I know if my cabin air filter needs replacing?
Weak airflow, musty smells, foggy windows, dust buildup, and allergy symptoms are common signs.
Can I clean a cabin air filter instead of replacing it?
Not properly. Most are paper or carbon filters and are not designed to be cleaned. Cleaning only removes surface dust, not trapped particles or bacteria.
Is a carbon cabin filter worth it?
Yes, especially in cities. Carbon filters remove odors, pollution, and exhaust gases better than standard filters.
Does winter or summer affect replacement timing?
Yes. Heavy heater or AC usage increases filter contamination. Seasonal use shortens lifespan.
Is cabin air filter replacement a scam upsell?
No. It’s one of the most legitimate maintenance items shops recommend. It’s just often overpriced for labor.
Can a dirty cabin filter cause bad smells in the car?
Yes. Mold, bacteria, and moisture buildup in dirty filters are a primary cause of musty AC odors.
Ask any car owner how long their vehicle will last and you’ll usually get a vague answer: “It depends.”
But if you’re specifically wondering how long a Mazda CX-5 lasts, the answer is more concrete and more interesting than you might expect.

The Mazda CX-5 has quietly earned a reputation for longevity, not because it’s flashy, but because it’s engineered to age well. This article breaks down what owners actually experience over time, what typically fails (and what doesn’t), and how long you can realistically expect a CX-5 to stay on the road.
The Short Answer (Then We’ll Go Deeper)
A well-maintained Mazda CX-5 typically lasts 200,000 to 250,000 miles (320,000 to 400,000 km).
Many owners report going well beyond that with routine maintenance.
But mileage alone doesn’t tell the full story.
Why the Mazda CX-5 Ages Better Than Most Compact SUVs
Longevity isn’t accidental. The CX-5 benefits from several engineering decisions that favor durability over short-term trends.
1. No CVT Transmission
One of the biggest reasons many SUVs don’t age well is the CVT. Mazda avoided that trap.
The CX-5 uses a traditional 6-speed automatic transmission, which:
- Handles heat better over time
- Is easier to service
- Has a proven long-term reliability record
This alone adds years to a vehicle’s usable life.
2. Naturally Aspirated Engines That Aren’t Overstressed
Most CX-5 models use Mazda’s 2.5-liter four-cylinder engine, which is known for:
- Conservative tuning
- Strong internal components
- Lower long-term stress
Even turbocharged CX-5 models tend to hold up well when maintained properly, because Mazda didn’t chase extreme output numbers.
3. Mazda’s “Understated” Reliability Philosophy
Mazda doesn’t chase the newest tech for headlines. Instead, it focuses on refining systems over time. That means:
- Fewer first-generation failures
- Better real-world reliability
- Less electronic complexity compared to some competitors
This pays dividends after 8–10 years of ownership.
What Mazda CX-5 Owners Actually Experience Over Time
Let’s break longevity into realistic stages.
0–100,000 Miles: Almost Boring (In a Good Way)
Most CX-5s experience very few issues in this phase. Typical maintenance includes:
- Oil changes
- Brake pads and rotors
- Tires
- Battery replacement
Major mechanical failures are uncommon.
100,000–200,000 Miles: The True Test
This is where weaker vehicles start to fall apart — and where the CX-5 usually keeps going.
Common maintenance items may include:
- Suspension components (shocks, bushings)
- Wheel bearings
- Cooling system service
- Spark plugs and coils
Engines and transmissions typically remain solid if fluids were serviced on time.
200,000+ Miles: Still Alive With Care
Reaching this milestone isn’t rare for the CX-5. Vehicles that make it here usually:
- Had consistent oil changes
- Avoided overheating
- Received transmission and brake service
At this point, age-related wear becomes more about economics than capability. Many CX-5s are still mechanically sound but retired due to cosmetic wear or owner upgrades.
What Usually Doesn’t Fail on a CX-5
This matters just as much as what does fail.
Owners consistently report:
- Few engine failures
- Minimal transmission issues
- Strong AWD system reliability
- Fewer electrical gremlins than competitors
These are the big-ticket items that determine whether a car lasts 10 years or 20.
How Maintenance Affects CX-5 Lifespan (A Lot)
Two identical Mazda CX-5s can have wildly different lifespans depending on maintenance habits.
CX-5s That Die Early Usually Have:
- Skipped oil changes
- Overheated engines
- Ignored warning lights
- Never-serviced transmissions
CX-5s That Last Forever Usually Have:
- Oil changes every 6,000–8,000 miles
- Transmission fluid service (even if “lifetime”)
- Brake and suspension maintenance
- Quality tires and alignments
Maintenance doesn’t just prevent failure — it extends life dramatically.
How the Mazda CX-5 Compares to Other SUVs for Longevity
In the compact SUV segment, the CX-5 regularly outlasts:
- Many CVT-equipped competitors
- SUVs with smaller, highly boosted engines
- Vehicles overloaded with fragile electronics
It competes closely with brands known for long life, but often at a lower long-term ownership cost.
Is the Mazda CX-5 a Good Long-Term Buy?
If your goal is to buy a vehicle and keep it for 10–15 years, the CX-5 is one of the safest bets in its class.
It’s especially appealing for:
- Families planning long ownership
- Buyers who value reliability over trends
- Drivers who want fewer surprises after 100,000 miles
The Real Question Isn’t “How Long Will It Last?”
The better question is:
How long do you want it to last?
Because with basic care, a Mazda CX-5 will often outlast:
- Your loan
- Your warranty
- Your expectations
That’s why so many owners replace their CX-5 not because it failed — but because they simply wanted something new.
Final Verdict
So, how long do Mazda CX-5s last?
With proper maintenance:
- 200,000 miles is normal
- 250,000 miles is common
- 300,000+ miles is achievable
In a market full of short-lived complexity, the Mazda CX-5 stands out by quietly doing what matters most: lasting.
Can a Mazda CX-5 really last over 200,000 miles?
Yes, and many do. A properly maintained Mazda CX-5 commonly reaches 200,000 to 250,000 miles, and some owners report exceeding that. The key factors are regular oil changes, cooling system care, and not ignoring warning signs.
What usually ends the life of a Mazda CX-5?
Surprisingly, it’s rarely the engine or transmission. Most CX-5s are retired due to neglected maintenance, accident damage, or repair costs outweighing vehicle value, not because the drivetrain fails.
Do turbocharged Mazda CX-5s last as long as non-turbo models?
They can, but maintenance matters more. Turbo CX-5s require more frequent oil changes and careful warm-up habits. Owners who follow service intervals closely often see similar longevity to non-turbo models.
At what mileage do Mazda CX-5s start needing “real” repairs?
For most owners, notable wear begins around 120,000 to 150,000 miles. This usually involves suspension components, wheel bearings, or cooling parts — not catastrophic failures.
Is the Mazda CX-5 more durable than other compact SUVs?
In many cases, yes. The CX-5 avoids CVT transmissions and overly complex electronics, which helps it age more gracefully than many competitors in the compact SUV class.
Can poor maintenance cut a CX-5’s lifespan in half?
Absolutely. Skipping oil changes, ignoring transmission service, or allowing the engine to overheat can reduce a CX-5’s life dramatically. Maintenance habits matter more than model year.
Why do so many owners replace their CX-5 even though it still runs fine?
Most replacements happen for lifestyle reasons, not reliability. Owners upgrade for new tech, safety features, or personal preference — not because the CX-5 has reached the end of its usable life.
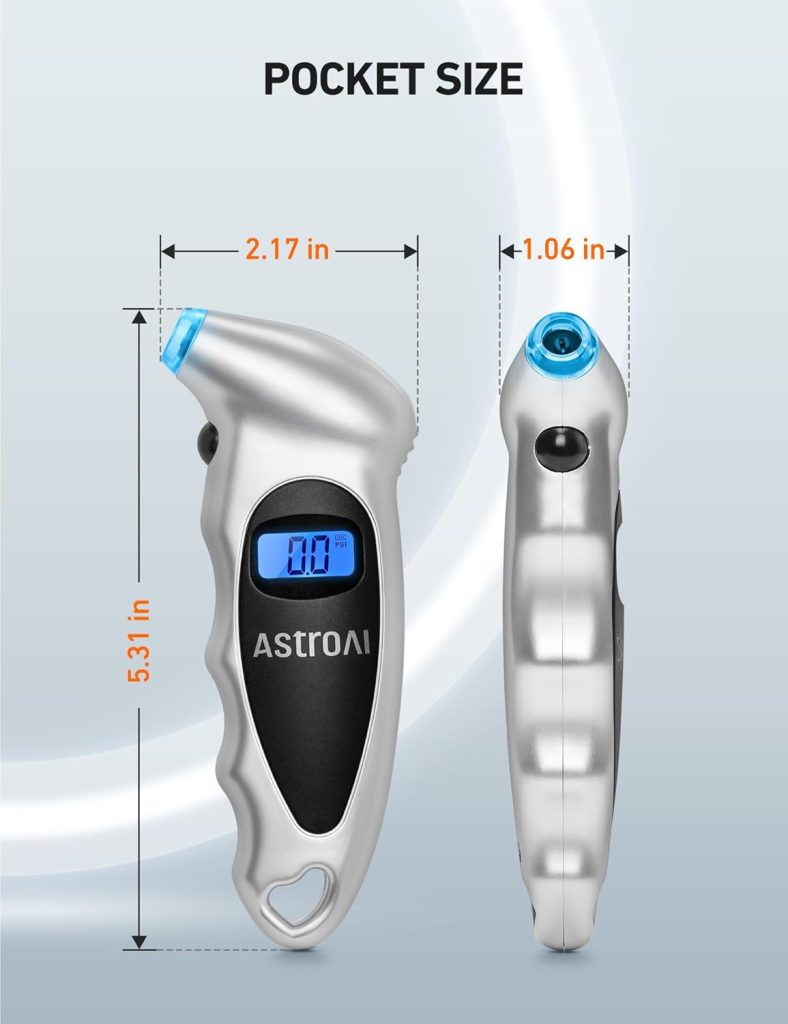
Best Tire Gauge: How to Choose One That’s Actually Accurate (And Why Most People Buy the Wrong One)
A tire gauge is one of the cheapest tools you can own, yet it directly affects safety, fuel economy, tire life, and how your car feels on the road. Despite that, most drivers either do not own one or use the first cheap gauge they find at a gas station without understanding what makes a gauge accurate or reliable.
This guide explains what the best tire gauge really is, how different types work, which ones professionals trust, and how to avoid the most common mistakes people make when buying or using one.
If you want a tire gauge that actually gives you correct readings instead of false confidence, this article is for you.
Why a Tire Gauge Matters More Than Most People Think
Tire pressure affects more than just ride comfort.
Incorrect pressure can cause:
- Uneven tire wear
- Reduced braking performance
- Poor fuel economy
- Sluggish steering
- Increased risk of blowouts
- Compromised traction in wet conditions
Even modern vehicles with tire pressure monitoring systems are not a replacement for a manual gauge. TPMS systems often:
- Trigger only when pressure is dangerously low
- Measure relative pressure, not exact PSI
- Drift over time
- Lag behind actual pressure changes
A tire gauge gives you exact numbers, not warnings after the damage has already started.
What Makes a Tire Gauge “Good” vs “Bad”
Not all tire gauges are equal. Accuracy, durability, and consistency matter far more than brand names or fancy designs.
A good tire gauge should:
- Give repeatable readings
- Read within 1 PSI accuracy
- Work in cold and hot conditions
- Seal properly on the valve stem
- Be easy to read without guesswork
A bad tire gauge:
- Gives inconsistent readings
- Loses calibration quickly
- Leaks air during measurement
- Is hard to read or ambiguous
- Breaks after minor drops
Price alone does not determine quality, but extremely cheap gauges often sacrifice accuracy and durability.
The Main Types of Tire Gauges (And What They’re Good At)
Pencil-Style Tire Gauges
These are the classic stick gauges many people grew up with.
How they work:
- Air pressure pushes a calibrated rod outward
- PSI markings are printed on the rod
Pros:
- Simple
- No batteries
- Compact
- Inexpensive
Cons:
- Can stick or jam over time
- Hard to read in low light
- Less precise at higher PSI ranges
Best for:
- Emergency use
- Glove box backup
- Basic checks on standard passenger cars
A quality pencil gauge is still better than guessing, but it should not be your only gauge.
Dial Tire Gauges
Dial gauges use a mechanical needle and internal spring mechanism.
How they work:
- Air pressure moves a needle across a numbered dial
- Pressure is held until manually released
Pros:
- Easier to read than pencil gauges
- More accurate when well-made
- Durable metal construction available
- Often used in professional settings
Cons:
- Can lose calibration if dropped
- Larger than pencil gauges
- Cheaper versions may drift over time
Best for:
- Enthusiasts
- Home garages
- Drivers who want reliable readings without batteries
A high-quality dial gauge is one of the best all-around options.
Digital Tire Gauges
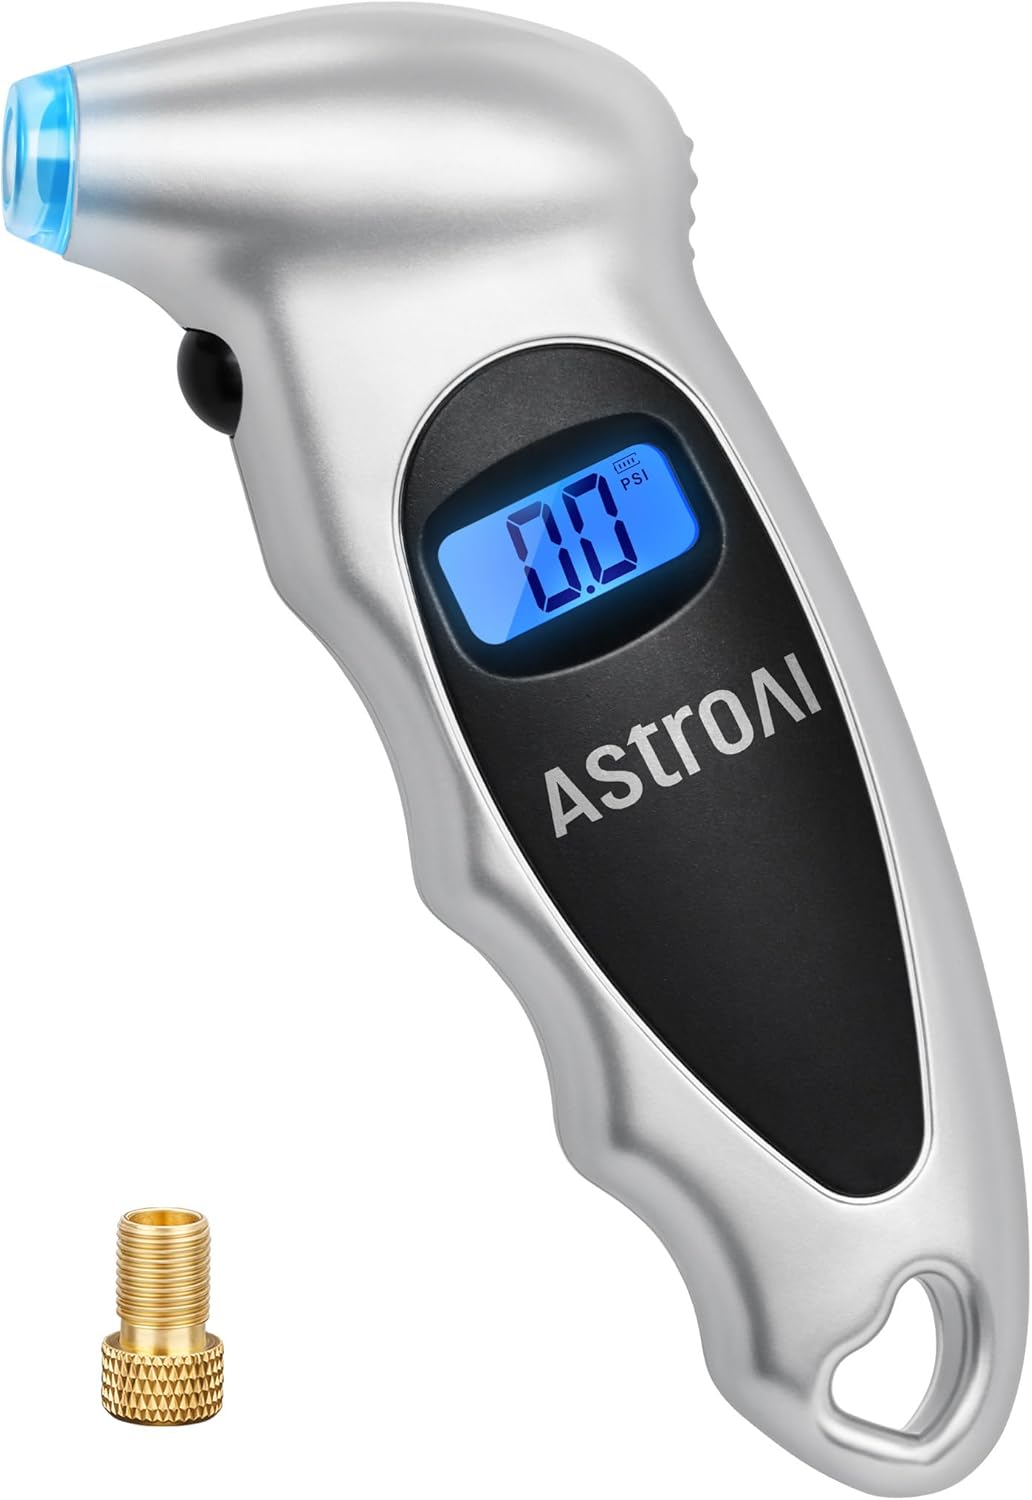
Digital gauges display pressure on an electronic screen.
How they work:
- Electronic pressure sensors convert air pressure into digital readings
Pros:
- Very easy to read
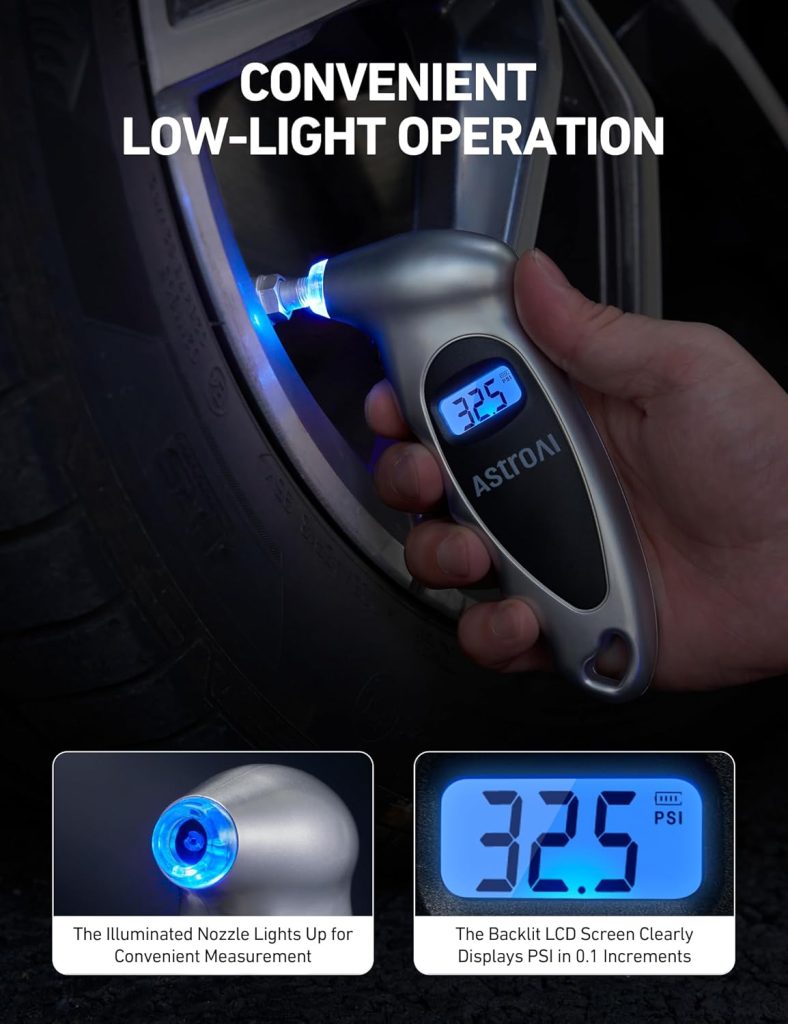
- Often precise to 0.1 PSI
- Useful in low light
- Can switch between PSI, BAR, and kPa
Cons:
- Requires batteries
- Electronics can fail
- Cheap models can be inaccurate
- Slower response in extreme cold
Best for:
- Drivers who want clarity
- Modern vehicles with specific PSI requirements
- People who prefer digital readouts
A well-made digital gauge can be excellent, but quality matters more here than with mechanical gauges.
Combination Inflator Gauges
These are gauges built into air hoses or inflators.
Pros:
- Convenient
- One-tool solution
- Common in garages and shops
Cons:
- Accuracy varies widely
- Can be affected by hose pressure loss
- Often less precise than standalone gauges
Best for:
- Quick adjustments
- Shop environments
- Not ideal as a primary measuring tool
Many professionals use a standalone gauge to verify readings from inflator gauges.
Accuracy: The One Thing Most Buyers Ignore
The biggest mistake people make when buying a tire gauge is assuming all gauges are accurate.
They are not.
Even brand-new gauges can be off by 2 to 5 PSI. That may not sound like much, but it is enough to:
- Accelerate tire wear
- Reduce fuel economy
- Alter handling
- Trigger or suppress TPMS warnings incorrectly
Professional-grade gauges are often tested and calibrated. Cheap gauges usually are not.
If accuracy matters, buy a gauge designed for automotive use, not a novelty keychain tool.
PSI Range Matters More Than You Think
Many cheap gauges are designed for wide PSI ranges, such as 0 to 100 PSI. That reduces precision where you actually need it.

Passenger vehicles typically require:
- 30 to 40 PSI
A gauge optimized for:
- 0 to 60 PSI
will be more accurate in that range than one stretching to 100 PSI.
This is why professional gauges are often range-specific.
How to Use a Tire Gauge Correctly (Most People Don’t)
Even the best gauge will give bad readings if used incorrectly.
Always measure tire pressure:
- When tires are cold
- Before driving or after sitting for several hours
- On level ground
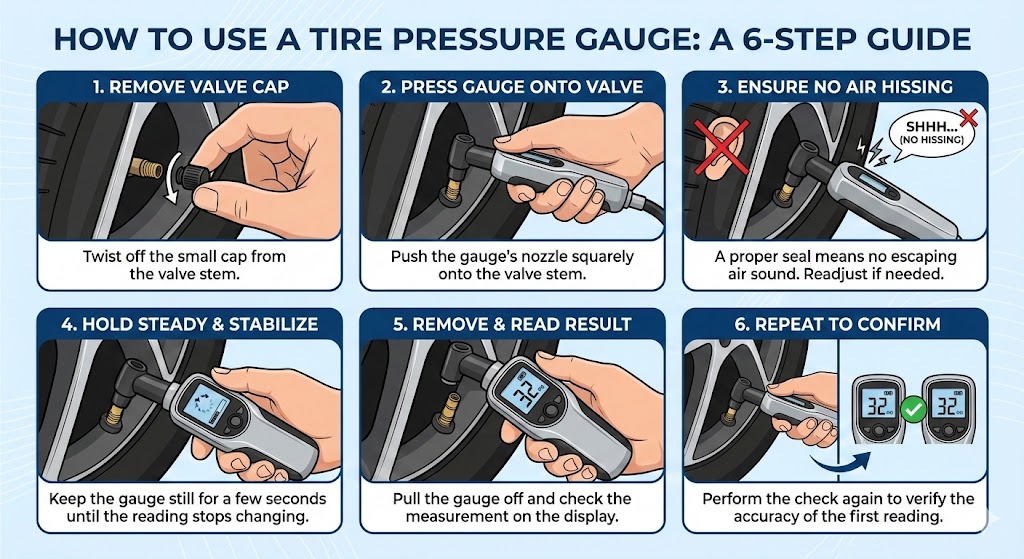
Steps:
- Remove the valve cap
- Press the gauge straight onto the valve stem
- Ensure no air hissing occurs
- Hold steady until the reading stabilizes
- Remove and read the result
- Repeat once to confirm
If readings differ, use the second reading.
Never trust a single rushed measurement.
Common Tire Gauge Myths
“Gas station gauges are accurate”
Most are abused, dropped, and never calibrated. Treat them as rough estimates only.
“Digital is always better”
Only if the sensor is high quality. Cheap digital gauges can be worse than good mechanical ones.
“One gauge is enough forever”
Gauges can drift. Periodic comparison with another gauge is smart.
“TPMS replaces a gauge”
TPMS is a warning system, not a measuring tool.
How Often Should You Check Tire Pressure?
Best practice:
- Once a month
- Before long trips
- With seasonal temperature changes
- After hitting potholes or curbs
Temperature changes alone can alter pressure by several PSI.
Signs Your Tire Gauge Is No Longer Reliable
Replace or verify your gauge if:
- Readings vary wildly
- The needle sticks
- Digital display flickers
- Air leaks during measurement
- Results differ drastically from known-good gauges
A faulty gauge is worse than no gauge because it creates false confidence.
Professional Advice on Choosing the Best Tire Gauge
If you want a simple rule:
- For everyday drivers: high-quality dial gauge
- For clarity and convenience: reputable digital gauge
- For backup use: pencil gauge only
Avoid ultra-cheap novelty gauges. Accuracy is more important than design.
Final Verdict: What Is the Best Tire Gauge?
The best tire gauge is not the most expensive or flashy. It is the one that:
- Gives consistent readings
- Matches your vehicle’s PSI range
- Is easy to use correctly
- Holds accuracy over time
A good tire gauge costs less than a tank of gas but protects thousands of dollars in tires and improves safety every time you drive.
That makes it one of the smartest tools you can own.
Old gasoline is a problem most car owners eventually run into. A Mazda that sat too long, a spare fuel can from last summer, or a vehicle parked during travel or repairs. When fuel goes bad, it is not just an inconvenience. It can cause real damage to modern Mazda fuel systems if handled incorrectly.

This guide explains how to get rid of old gasoline the right way, following U.S. safety and environmental rules, with specific considerations for Mazda vehicles. If you drive a Mazda and are dealing with stale fuel, this is what you need to know before doing anything else.
For Mazda service guidance or professional help, owners can always start at
https://www.marinmazda.net/
Why Old Gasoline Is Especially Risky for Mazda Vehicles
Gasoline does not stay fresh forever. In most real-world conditions:
- Gasoline begins degrading after 3 to 6 months
- Ethanol-blended fuel breaks down faster
- Moisture contamination increases over time
Modern Mazda engines, especially Skyactiv-G and turbocharged models, use high-pressure fuel systems and precision injectors. These components are far less tolerant of stale or contaminated fuel than older engines.
When old gasoline is left in a Mazda, it can:
- Cause hard starts or no-start conditions
- Trigger check-engine lights
- Lead to injector clogging
- Damage fuel pumps
- Create rough idle or hesitation
Mazda service departments regularly advise removing old fuel rather than attempting to drive through it.
If your Mazda has been sitting and you suspect bad fuel, the safest next step is to contact a certified Mazda service department such as
https://www.marinmazda.net/service
How to Tell If Gasoline Is Too Old to Use

Old gasoline usually shows clear warning signs. If you notice any of the following, disposal is the correct move:
- Sour, varnish-like smell instead of a sharp gasoline odor
- Dark yellow or brown color
- Cloudy appearance or sediment
- Engine misfires or stalls after sitting
- Vehicle struggles to start even with a healthy battery
If a Mazda has been parked for more than six months without fuel stabilizer, assume the fuel quality has degraded.
What You Should Never Do With Old Gasoline
In the United States, improper gasoline disposal is both dangerous and illegal in many areas.

Never:
- Dump gasoline onto the ground
- Pour it into storm drains or sewers
- Burn it in open containers
- Throw it in household trash
- Mix it with oil or other automotive fluids
Gasoline is classified as household hazardous waste. Disposal must be handled responsibly to avoid environmental damage and fire risk.
The Correct Ways to Dispose of Old Gasoline in the U.S.
1. Household Hazardous Waste Facilities (Best Option)

Most cities and counties in the U.S. operate Household Hazardous Waste facilities or scheduled collection events. These locations are specifically designed to handle gasoline safely.
Steps:
- Store old gasoline in an approved fuel container
- Keep it sealed and upright
- Transport it securely
- Drop it off during operating hours
This method is usually free for residents and is the option most recommended by Mazda service professionals.
If you are unsure how to remove fuel from your Mazda safely, scheduling professional service is strongly advised:
https://www.marinmazda.net/schedule-service
2. Professional Fuel Removal by a Mazda Service Department

If old gasoline is already inside your Mazda’s fuel tank, the safest solution is professional removal.
Mazda technicians can:
- Drain the fuel properly
- Inspect the fuel system
- Prevent injector or pump damage
- Dispose of the fuel through approved channels
This option is especially important for:
- Turbocharged Mazda models
- Vehicles that sat longer than one year
- Cars that already show drivability issues
Service appointments can be scheduled directly through
https://www.marinmazda.net/service
3. Dilution for Mildly Stale Fuel (Limited Situations Only)
If gasoline is only slightly old and shows no signs of contamination, some U.S. guidelines allow controlled dilution.
This involves:
- Mixing one part old fuel with five to ten parts fresh gasoline
- Using it only in non-turbocharged vehicles
- Driving gently until the diluted fuel is consumed
Important Mazda note:
This is not recommended for turbocharged Mazda engines or vehicles with direct injection sensitivity. When in doubt, disposal is safer than dilution.
How to Remove Old Gasoline From a Mazda Safely
Professional Removal (Recommended)
Mazda service departments have proper equipment to drain fuel safely without damaging components. This is the preferred method for modern Mazdas.
Schedule assistance here:
https://www.marinmazda.net/schedule-service
DIY Siphoning (Use Caution)

If removing fuel yourself:
- Use a hand-pump siphon only
- Never mouth-siphon
- Work outdoors away from sparks or heat
- Use an approved fuel container
Once removed, the gasoline must still be disposed of legally.
Proper Containers for Old Gasoline
Always use:
- DOT-approved gasoline containers
- Clearly labeled fuel cans
- Tight-sealing caps
Never store gasoline in:
- Plastic drink containers
- Glass bottles
- Open buckets
- Unmarked containers
Improper storage greatly increases fire and vapor risks.
Environmental and Legal Considerations in the U.S.
Gasoline contains hazardous compounds that contaminate soil and groundwater. Improper disposal can result in fines and environmental damage.
This is why Mazda dealerships and service centers follow strict disposal procedures and why owners are strongly encouraged to do the same.
For guidance or assistance, contacting a certified Mazda dealer such as
https://www.marinmazda.net/
is always a safe starting point.
How Mazda Owners Can Prevent Old Gas Problems
To avoid dealing with stale fuel in the future:
- Use fuel stabilizer if storing longer than three months
- Keep the fuel tank at least half full during storage
- Start and drive the vehicle monthly when possible
- Avoid long-term storage with ethanol-heavy fuel
- Follow Mazda’s recommended maintenance schedule
Mazda service teams can also advise on long-term storage preparation and fuel system care.
Final Advice for Mazda Owners
If you are dealing with old gasoline:
- Do not dump it
- Do not ignore it
- Do not guess
Use approved disposal methods or professional service. Old fuel is inexpensive to dispose of properly. Fuel system repairs are not.
For Mazda-specific service support, inspections, or fuel system concerns, visit
https://www.marinmazda.net/
Frequently Asked Questions About Old Gasoline (Mazda Owners)
1. How long can gasoline safely sit in a Mazda before it goes bad?
In most cases, gasoline begins to degrade after 3 to 6 months, especially ethanol-blended fuel. If your Mazda has been sitting longer than that without a fuel stabilizer, the fuel quality may already be compromised and should be inspected or removed by a professional service department.
For help, Mazda owners can contact
https://www.marinmazda.net/service
2. Can old gasoline damage my Mazda’s engine or fuel system?
Yes. Old gasoline can clog fuel injectors, damage the fuel pump, and cause rough idle, misfires, or hard starts. Modern Mazda engines use tight-tolerance fuel systems that are more sensitive to contaminated or stale fuel than older vehicles.
If symptoms appear, professional inspection is strongly recommended:
https://www.marinmazda.net/schedule-service
3. Should I try to drive out old gas instead of removing it?
This depends on how old the fuel is. Mildly stale fuel may sometimes be diluted with fresh gas, but if the gasoline smells sour, looks dark, or the vehicle runs poorly, driving it can cause further damage. Mazda service technicians generally recommend removing bad fuel rather than forcing it through the system.
4. Can a Mazda dealership dispose of old gasoline?
Many Mazda service departments can safely drain old fuel and dispose of it through approved hazardous waste channels. Availability and fees may vary, so it is best to call ahead or schedule service directly with a certified Mazda dealer such as
https://www.marinmazda.net/service
5. Is it illegal to dump old gasoline in the U.S.?
Yes. Gasoline is classified as household hazardous waste in the United States. Dumping it on the ground, into drains, or into trash containers can result in environmental damage and fines. Proper disposal through approved facilities or professional service is required.
6. How can I prevent gasoline from going bad in my Mazda during storage?
To prevent fuel degradation:
- Use a fuel stabilizer if storing longer than three months
- Keep the tank at least half full
- Start and drive the vehicle periodically
- Follow Mazda maintenance recommendations
If you plan long-term storage, a Mazda service team can help you prepare properly:
https://www.marinmazda.net/
Which Cylinders Does AFM Deactivate in the GM 6.2L V8? The Real Answer Explained Clearly
If you’re asking which cylinders AFM deactivates in the GM 6.2L V8, you’re already ahead of most buyers. This is not trivia. This detail explains why certain lifters fail, why ticking noises show up where they do, and why AFM and DFM engines develop uneven wear over time.
This article breaks it down plainly. No marketing language. No myths. Just how the system actually works on GM’s 6.2-liter V8.
Quick Answer (Then We’ll Go Deep)
On GM 6.2L V8 engines equipped with AFM (Active Fuel Management), the system deactivates:
Cylinders 1, 4, 6, and 7
The engine continues running on:
Cylinders 2, 3, 5, and 8
This pattern is fixed on AFM engines.
GM 6.2L V8 Cylinder Layout (Important to Understand)
Before AFM makes sense, you need to understand GM’s cylinder numbering. GM does not number cylinders left to right like some brands.
Facing the engine from the front of the truck:
Driver side (left bank):
- Cylinder 1
- Cylinder 3
- Cylinder 5
- Cylinder 7
Passenger side (right bank):
- Cylinder 2
- Cylinder 4
- Cylinder 6
- Cylinder 8
This layout applies to:
- Silverado 1500
- Sierra 1500
- Tahoe
- Suburban
- Yukon
- Escalade
with the 6.2L V8
Which Cylinders Shut Down Under AFM?
When AFM activates, the engine disables:
- Cylinder 1 (driver front)
- Cylinder 4 (passenger second)
- Cylinder 6 (passenger third)
- Cylinder 7 (driver rear)
These cylinders stop:
- Opening valves
- Injecting fuel
- Firing spark
The engine becomes a V4 under light load, typically during steady highway cruising.
Why GM Chose These Specific Cylinders
This was not random.
GM selected these cylinders to:
- Maintain crankshaft balance
- Reduce vibration
- Keep exhaust pulses evenly spaced
- Avoid shutting down adjacent cylinders on the same bank
From an engineering standpoint, the choice makes sense.
From a long-term wear standpoint, this decision created a problem.
The AFM Lifter Problem Explained Simply
AFM cylinders use special collapsible lifters. These lifters physically change shape when oil pressure is applied, allowing the valves to stay closed.
Here’s the issue:
- The same four cylinders are always deactivated
- Their lifters experience different heat, oil flow, and wear
- The remaining four cylinders work constantly
Over time, this creates uneven lifter wear across the engine.
Reddit mechanics explain it bluntly:
The AFM lifters live a harder life than the rest.
Why AFM Failures Often Hit the Same Cylinders
If you read enough GM truck teardown threads, a pattern shows up.
Failures often involve:
- Cylinder 1
- Cylinder 6
- Cylinder 7
Those are all AFM cylinders.
When one AFM lifter collapses or sticks:
- The valve may stop opening
- The cam lobe gets damaged
- Metal circulates through the engine
That’s why AFM failures escalate quickly if ignored.
Does This Apply to the 6.2L Specifically?
Yes.
The GM 6.2L V8 uses the same AFM logic as the 5.3L, just scaled up.
The 6.2L AFM system:
- Deactivates the same cylinder pattern
- Uses similar lifter architecture
- Suffers from the same uneven wear concept
The difference is cost. When a 6.2L fails, repairs are usually more expensive.
What About DFM on Newer 6.2L Engines?
Starting around 2019, GM replaced AFM with DFM (Dynamic Fuel Management) on many 6.2L engines.
This changes things slightly.
AFM:
- Always deactivates cylinders 1, 4, 6, 7
DFM:
- Can deactivate different combinations of cylinders
- Not limited to a fixed group
- Adjusts in real time based on load
However, Reddit consensus is clear:
DFM did not eliminate lifter problems. It just made the pattern less predictable.
Early DFM 6.2L engines still experience lifter failures, just without the consistent cylinder pattern seen in AFM engines.
Why AFM Disablers Don’t “Fix” the Cylinder Issue
Many owners install AFM disablers or tuning devices.
Important reality:
- Disablers stop cylinder deactivation electronically
- They do not remove AFM lifters
- They do not change which cylinders were designed for AFM
If wear has already begun on cylinders 1, 4, 6, or 7, disabling AFM will not undo it.
This is why Reddit is full of posts that say:
“I disabled AFM early and still lost a lifter.”
How This Affects Buyers and Owners
Knowing which cylinders AFM deactivates helps you:
- Diagnose ticking noises more accurately
- Understand why certain misfire codes repeat
- Make informed decisions when buying used
- Decide whether AFM delete work is worth it
It also explains why oil consumption often precedes failure. AFM lifters rely heavily on oil pressure. Once oil control degrades, the AFM cylinders suffer first.
Common Symptoms Tied to AFM Cylinders
Owners frequently report:
- Ticking from the driver side rear (cylinder 7 area)
- Random misfire on cylinder 1 or 6
- Rough idle after highway driving
- Noise that disappears under throttle
These symptoms align directly with AFM cylinder locations.
Final Takeaway
On GM 6.2L V8 engines with AFM:
- Cylinders 1, 4, 6, and 7 are deactivated
- The pattern is fixed
- These cylinders experience unique wear
- Most AFM-related failures trace back to this design
AFM was built to save fuel. It succeeded at that.
But it also introduced uneven mechanical stress, and over time, that stress shows up exactly where the system operates.
Once you understand which cylinders AFM deactivates, a lot of GM V8 “mysteries” suddenly make sense.
Connect with us


